To quickly reassign your keyboard keys using software like SharpKeys or VIA, simply select the key you want to change and assign it to a new function. Both programs offer user-friendly interfaces that make remapping straightforward, whether you’re customizing for better gaming, accessibility, or productivity.
In just a few clicks, you can customize your keyboard layout to suit your needs, whether through SharpKeys’s simple registry editing approach or VIA’s real-time configurator. These tools allow you to remap keys without complicated coding or hardware modifications, making personalization accessible and hassle-free. If you’re tired of reaching for the same keys or want to optimize your workflow, these software solutions are your ticket to a more efficient typing experience.
If you’re looking to remap keys on your keyboard using software like SharpKeys or VIA, you don’t need to be a tech wizard. Just download the program, select the key you want to change, assign a new function, and save your settings. The process is quick, intuitive, and tailored to help you customize your keyboard exactly how you want it—no fancy technical skills required.

How to remap keys using software like SharpKeys or VIA
Understanding Key Remapping and Why It Matters
Key remapping allows you to change the function of a key on your keyboard. This can help improve your productivity, reduce strain, or customize your setup to better suit your needs. Whether you want to swap the Ctrl and Alt keys or disable a pesky key, remapping makes your keyboard work the way you want.
Choosing the Right Software: SharpKeys and VIA
There are different tools available for remapping keys, but SharpKeys and VIA are among the most popular. SharpKeys is simple and effective for basic remapping tasks, while VIA offers more advanced features and live remapping capabilities. Depending on your needs, pick the software that fits best.
Installing SharpKeys
Installing SharpKeys is straightforward. Visit the official website, download the latest version, and run the installer. Follow the prompts to complete the installation process. Once installed, launch SharpKeys to start customizing your keyboard.
Supported Operating Systems for SharpKeys
SharpKeys works primarily on Windows. Make sure your system meets the minimum requirements before installing. It is compatible with Windows 7, 8, 10, and 11.
Using SharpKeys to Remap Keys
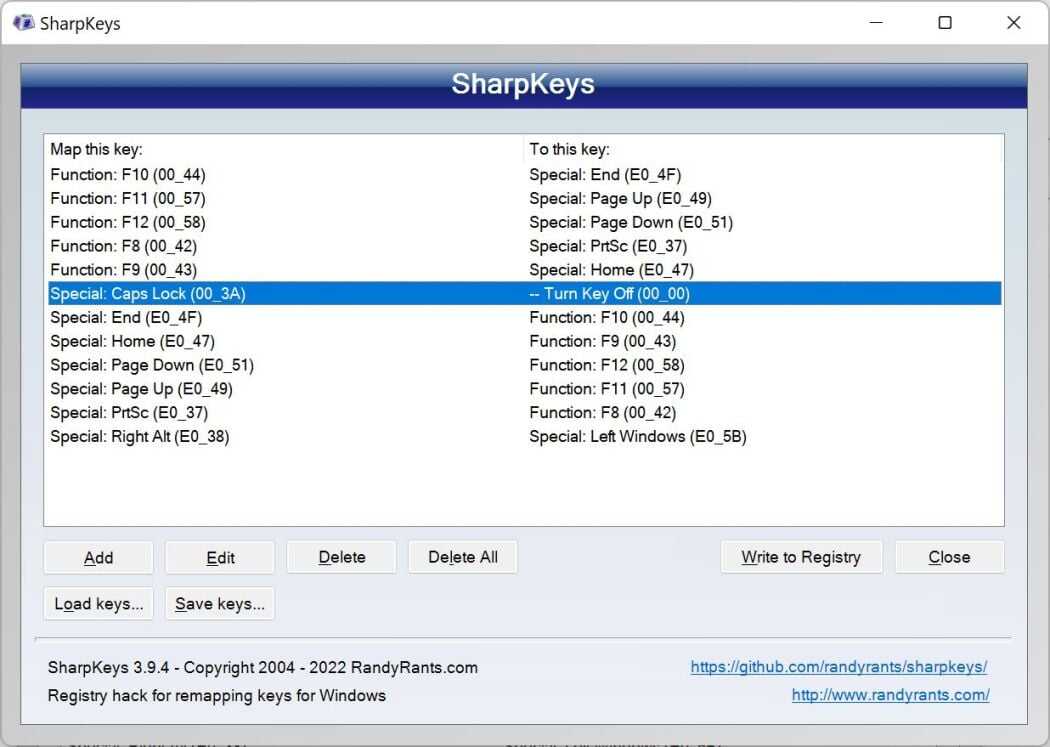
Remapping keys with SharpKeys involves a simple process. Click on the “Add” button, select the key you want to change, and then choose the new function for that key. When finished, click “Write to Registry” to save your settings.
Steps to Remap a Key with SharpKeys
- Open SharpKeys and click on the “Add” button.
- Select the key you want to remap from the list or press “Type Key” to identify it manually.
- Choose the key or function you want it to perform from the second list.
- Click “OK” and repeat this process for other keys if needed.
- After all changes, click “Write to Registry” and restart your computer.
Using VIA for Key Remapping
VIA is a powerful tool for customizing mechanical keyboards, especially those with configurable firmware like QMK. It provides real-time remapping and is popular among enthusiasts for its flexibility.
Getting Started with VIA
First, ensure your keyboard supports VIA firmware. Download the VIA software from the official site and connect your keyboard. Some keyboards need firmware flashing before they can work with VIA.
Remapping Keys with VIA
In VIA, you access the keymap editor, where you can click on individual keys and assign new functions instantly. Changes are applied immediately, making testing easier.
Steps to Remap Keys Using VIA
- Open the VIA software and connect your compatible keyboard.
- Navigate to the “Keymap” tab.
- Click on a key to select it.
- Choose the new function or key from the available options.
- Save your layout. Changes should be live within seconds.
Understanding Key Codes and Functions
Both SharpKeys and VIA rely on key codes for remapping. Familiarizing yourself with common key names like “Left Control,” “Escape,” or “Space” helps in making precise changes. Additionally, you can remap keys to perform functions like launching applications or opening files.
Advanced Customizations with SharpKeys and VIA
While SharpKeys covers basic remapping, VIA allows more advanced setups. You can assign macros, create layers, or set custom key combinations in VIA. This makes it ideal for gamers and power users.
Creating Custom Macros and Shortcuts
VIA enables you to record sequences of keystrokes as macros. These can be assigned to any key, saving time for repetitive tasks or complex commands.
Layered Keymaps and Multiple Profiles
VIA supports multiple profiles so you can switch between different keyboard layouts easily. This is helpful if you use your keyboard for both work and gaming.
Backing Up and Restoring Settings
It’s smart to back up your remapping configurations. SharpKeys saves changes within the Windows registry, and you can export registry files. VIA allows exporting profiles for quick restoration.
Backing Up Your Configurations
In SharpKeys, export your registry settings via the Windows registry editor. For VIA, save the current layout to a file for future use.
Troubleshooting Common Issues
Some remapping tasks may not work as expected, often due to software conflicts or incorrect key codes. Restart your computer after changes, and ensure your software and firmware are up to date.
Software Conflicts
If remapped keys behave oddly, check for other tools that might interfere. Disable conflicting software or run your remapping tool as administrator.
Key Not Remapping Correctly
Ensure you selected the correct key code. Sometimes, remapping complex keys like multimedia keys may require additional setup.
Legal and Safety Considerations
Always use trusted software from official sources to prevent security issues. Avoid remapping keys in a way that could violate workplace policies or software terms of service.
Additional Tips for Effective Key Remapping
Test your remapings thoroughly to ensure they function as expected. Document your changes to keep track of adjustments over time.
Best Practices
– Start with small changes and test immediately.
– Keep backups of original key layouts.
– Use descriptive profiles for different setups.
Summary of Important Key Remapping Features
| Feature | Description |
|---|---|
| Simple Key Swap | Switch two keys’ functions quickly and easily. |
| Disable Keys | Turn off unwanted keys to prevent accidental presses. |
| Macros and Custom Commands | Create sequences of actions for faster workflows. |
| Profiles and Layers | Switch between different setups based on your tasks. |
Summary
Remapping keys using SharpKeys or VIA offers an easy way to customize your keyboard for increased comfort and efficiency. SharpKeys excels for basic changes, while VIA provides more dynamic and complex options. Choosing the right tool depends on your specific needs and the type of keyboard you use.
By understanding the features and processes involved, you can optimize your setup confidently and enjoy a personalized typing experience that truly fits your workflow.
How To Remap A Key Using SharpKeys
Frequently Asked Questions
What are the steps to remap a key using SharpKeys?
To remap a key with SharpKeys, start by opening the software and clicking on “Add” to create a new mapping. Then, select the key you want to change from the “Map this key” column and choose the new function or key in the “To this key” column. After confirming your selections, click “Write to Registry” and restart your computer to apply the changes.
Can VIA be used to customize keys on different keyboard layouts?
Yes, VIA supports a range of keyboard layouts, allowing you to remap keys based on the specific model you are using. Before customizing, verify your keyboard’s compatibility with VIA. Once confirmed, you can load your firmware into VIA and remap keys easily through its intuitive interface, ensuring the changes suit your preferred layout.
How do I troubleshoot remapping issues with SharpKeys or VIA?
If remapping doesn’t work as expected, first ensure you have saved and applied your changes correctly. For SharpKeys, check that you’ve written the changes to the registry and restarted your computer. With VIA, confirm that your firmware has been updated and that the key mappings are correctly loaded. If problems persist, double-check device compatibility and consult the software documentation for additional troubleshooting tips.
Is it possible to revert remapped keys back to their original functions?
Yes, both SharpKeys and VIA allow you to reset key mappings. In SharpKeys, you can delete specific mappings from the list and write the changes to the registry to restore defaults. With VIA, you can either reconfigure the keys back to their original functions or load a previous firmware state if you have saved one. Always back up your settings before making extensive modifications.
What precautions should I take before remapping keys on my keyboard?
Before remapping keys, back up your current settings or registry entries to prevent losing your original configuration. Make sure your keyboard is compatible with the software you plan to use. Also, avoid remapping critical keys that you frequently use, as this might make the keyboard less intuitive to operate. Lastly, follow the software instructions carefully to prevent unintended issues during the process.
Final Thoughts
In conclusion, remap keys using software like SharpKeys or VIA offers a simple way to customize your keyboard. These tools are user-friendly and allow quick remapping without complex setups. By following easy steps, you can assign functions that suit your needs. This process enhances your typing efficiency and overall experience.


