


To activate dual band settings on your router, simply access the router’s admin panel through a web browser, locate the wireless settings, and enable both the 2.4 GHz and 5 GHz bands. Save the changes, and your device should now be broadcasting on both frequencies, offering improved speed and reduced interference.
In short, you need to log into your router’s interface, find the wireless or network settings, and turn on the dual band feature. This allows you to optimize your Wi-Fi performance by using two different frequency bands, which can help reduce congestion and improve connection stability. Now, let’s walk through the steps to get your router dual-band ready so you can enjoy faster, more reliable internet at home or office.
Getting your router to support both 2.4 GHz and 5 GHz bands might sound complicated, but it’s actually quite straightforward. Most modern routers come with dual band capability built-in, and enabling it is just a matter of a few clicks. Whether you’re setting up a new router or optimizing an existing one, understanding how to activate dual band settings can significantly enhance your Wi-Fi experience. This feature helps distribute devices across different frequencies, preventing slowdowns and lag, especially in busy households or offices. So, if you want to unlock the full potential of your internet connection, learning how to enable dual band mode is the first step towards faster, more stable Wi-Fi.

How to activate dual band settings on your router
Understanding Dual Band Routers
A dual band router offers two Wi-Fi frequency bands: 2.4 GHz and 5 GHz. These bands allow you to connect different devices to the same router while optimizing speed and reducing interference. The 2.4 GHz band provides broader coverage, while the 5 GHz band offers faster speeds and is less crowded.
Benefits of Using Dual Band Settings
Activating dual band settings can improve your internet experience significantly. It helps prevent network congestion by distributing devices across two bands. This setup is especially useful for streaming, gaming, or working from home where high bandwidth is needed.
Check Your Router Compatibility
Before starting, verify if your router supports dual band functionality. You can find this information in the user manual, on the manufacturer’s website, or on the router itself. If your router only supports a single band, upgrading to a dual band model is necessary.
Accessing Your Router’s Admin Panel
To activate dual band settings, you must log into your router’s admin panel. Usually, this involves opening a web browser on a device connected to the network. Enter the router’s IP address, commonly “192.168.1.1” or “192.168.0.1”.
Logging In
Use your username and password to access the panel. Default credentials are often “admin” for both fields, but changing these for security is advisable. If you’ve customized your login credentials, use those instead.
Navigating to Wireless Settings
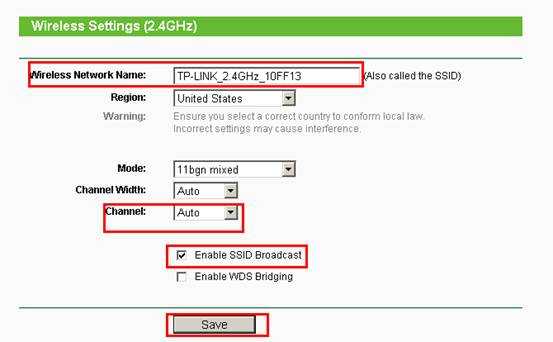
Once logged in, locate the wireless or Wi-Fi settings section. Different router brands may label this differently, such as “Wireless,” “Wi-Fi,” or “Wireless Network.” This is where you will find options to enable or configure the two bands.
Locating Dual Band Settings
Look for options labeled “Dual Band,” “2.4 GHz and 5 GHz,” or similar. Some routers have separate settings for each band, while others use a combined configuration.
Enabling Dual Band Mode
If your router has a toggle or checkbox for dual band mode, select or enable it. This action activates both bands, allowing devices to connect independently to either band.
Naming Your Networks (SSID)
Assign distinct names to each band, such as “MyWiFi-2.4” and “MyWiFi-5.” Unique SSIDs help identify each network easily and connect devices to the appropriate band.
Configuring Band Settings for Optimal Performance
Adjust advanced settings like channel selection, bandwidth, and security. Choosing the right channel can reduce interference from neighboring networks, especially on the 2.4 GHz band.
Choosing the Best Channels
Use tools like Wi-Fi analyzers to find less congested channels. For 2.4 GHz, channels 1, 6, and 11 are often optimal. For 5 GHz, selecting a wider or less crowded channel can enhance speeds.
Setting Security Protocols
Enable WPA3 or WPA2 security to protect your Wi-Fi networks. Use strong, unique passwords for each SSID to prevent unauthorized access.
Saving Changes and Restarting Your Router
After adjusting settings, save your configuration. Some routers require a restart to apply changes. This can usually be done from the admin panel with a simple click.
Verifying Dual Band Activation
Check whether both networks are broadcasting by scanning for Wi-Fi networks with your device. Confirm that you see the distinct SSIDs for both the 2.4 GHz and 5 GHz networks.
Connecting Devices to the Correct Band
Devices capable of connecting to 5 GHz should prefer that network for higher speeds. Many devices automatically select the best band, but you can also manually prioritize your connection.
Assigning Devices Manually
Access your device’s Wi-Fi settings, locate your network names, and select the appropriate SSID. For better performance, connect bandwidth-heavy devices to the 5 GHz band, reserving the 2.4 GHz for other devices.
Troubleshooting Common Issues
If you encounter problems activating dual band settings, double-check your router’s compatibility and firmware version. Ensure your firmware is up to date for optimal performance.
Resetting Your Router
Perform a factory reset if needed, then reconfigure your settings. Keep a record of your desired SSID names and passwords to simplify the process.
Updating Firmware
Visit your router manufacturer’s website to find the latest firmware. Updating firmware can fix bugs, improve stability, and enhance dual band support.
Additional Tips for Better Dual Band Performance
Position your router centrally in your home to maximize coverage. Keep the router away from thick walls and electronic interference. Regularly update your router’s firmware to maintain optimal operation.
Using Quality of Service (QoS) Settings
Enable QoS to prioritize bandwidth for important devices or activities, such as streaming or online gaming. This feature can help manage network traffic efficiently.
Secure Both Networks Separately
Use different passwords and security settings for each band if your router allows. It enhances your network’s security and prevents unauthorized access to either network.
Summary
Activating dual band settings on your router involves accessing the admin panel, enabling both bands, naming your networks, and optimizing settings. Proper configuration results in faster, more reliable Wi-Fi connections for all your devices.
The process is straightforward once you understand your router’s interface. Regular maintenance, like updating firmware and adjusting channels, ensures your dual band networks perform at their best.
Turn OFF 5 GHz WiFi to Connect Smart Devices
Frequently Asked Questions
What are the common steps to enable dual band mode on my router?
To enable dual band mode, first access your router’s admin panel through a web browser using its IP address or hostname. Login with your credentials, then navigate to the wireless settings or network options. Locate the band settings and select the option to enable or activate both 2.4 GHz and 5 GHz bands. Save the changes, and your router will operate on both frequencies simultaneously.
Why is it necessary to update my router’s firmware before enabling dual band functionality?
Updating your router’s firmware ensures compatibility with dual band features and fixes potential bugs that could hinder proper operation. Manufacturers often release updates that improve performance and security, which can be crucial for seamless dual band activation. Check the manufacturer’s website or your router’s admin panel for firmware updates before configuring dual band settings.
How can I assign different network names to the dual bands for better management?
Within your router’s wireless settings, you can typically set separate SSIDs (network names) for the 2.4 GHz and 5 GHz bands. Access the admin panel, locate the wireless or network section, and enter distinct names for each band. This helps you identify and connect to the desired frequency easily, especially when managing multiple devices.
Are there specific security settings I should enable after activating dual band mode?
Yes, after enabling dual band, make sure to configure security settings like WPA3 or WPA2 encryption to protect your network. Use strong, unique passwords for each band if they are assigned different SSIDs. Consistent security measures across both bands help prevent unauthorized access and safeguard your data.
What should I do if I cannot see both bands after activating dual band mode?
If you don’t see both bands available, restart your router and reconnect your devices. Check if your router supports dual band functionality and verify that you’ve enabled both bands in the settings. Ensure your device also supports 5 GHz Wi-Fi. If issues persist, consult the router’s manual or contact support to troubleshoot compatibility or configuration problems.
Final Thoughts
To activate dual band settings on your router, start by logging into the router’s admin panel. Locate the wireless or Wi-Fi settings menu. Enable both the 2.4 GHz and 5 GHz bands and assign distinct network names (SSIDs) for easy identification.
Save your changes and reconnect your devices to the preferred band. Remember, configuring dual band settings on your router enhances your Wi-Fi experience by reducing interference and improving speeds. Following these steps ensures your router operates smoothly on both bands, providing better connectivity throughout your space.



