To connect your printer directly to a router’s USB port, simply plug the printer’s USB cable into the router’s USB port, then access the printer settings on your network to enable sharing. This setup allows multiple devices on your network to print wirelessly without needing a dedicated print server or computer running constantly.
In short, connect your printer to the router’s USB port using a standard USB cable, then configure your printer on your network following the router’s instructions. This method makes printing more convenient, letting you print from any device connected to your Wi-Fi network without complex setups.
Getting your printer connected to your router via the USB port might seem tricky at first, but it’s actually quite straightforward. Many modern routers come with a USB port designed specifically for sharing printers or external storage devices. By plugging your printer directly into this port, you eliminate the need for a computer to act as a middleman, making the printing process smoother and more efficient. Just ensure your router supports printer sharing through its USB port, and follow the manufacturer’s setup instructions to get everything up and running. This quick connection turns your network into a powerful, shared printing hub accessible to all your devices.

How to Connect Printer to Router USB Port
Connecting your printer directly to a router’s USB port can be an excellent way to make printing simple and accessible for everyone in your home or office. This method allows multiple devices to share a single printer without the need for cables or connecting each device individually. Let’s explore how to set up your printer with a router’s USB port step by step.
Understanding the Basics of Printer and Router USB Connections
Before diving into the setup, it’s essential to understand the role of the router’s USB port. Unlike a computer, a router’s USB port acts as a bridge, allowing the router to communicate with your printer. Not all routers have this feature, so double-check if your device supports USB printing.
Printers can connect to routers via USB or Ethernet. USB connections are typically easier to set up and are ideal for smaller networks. When connected through the router, the printer becomes accessible wirelessly to all devices connected to the network.
Check Compatibility and Requirements
Determine if Your Router Supports USB Printing
- Look at your router’s specifications in the user manual or on the manufacturer’s website.
- Check if the USB port supports Printer Server or Print Sharing functions.
- Ensure the router has the latest firmware installed, which can improve compatibility and performance.
Gather Necessary Hardware
- Printer with USB port (preferably USB Type B for printers)
- Router with a working USB port supporting printing
- USB cable compatible with your printer and router (usually USB Type B to Type A)
- Computer or device for initial setup (if needed)
Step-by-Step Guide to Connect Printer to Router USB Port
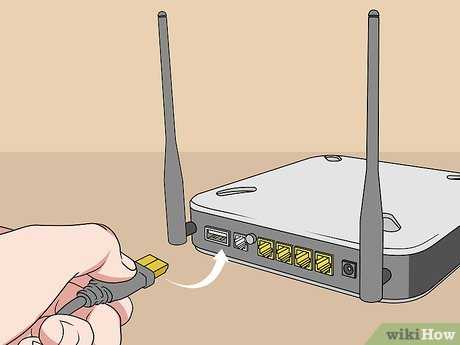
Step 1: Connect the Printer to the Router
Begin by powering off both the printer and the router. Connect the printer’s USB port to the router’s USB port using the compatible USB cable. Ensure the connection is secure on both ends.
Step 2: Power On Devices and Access Router Settings
Switch on the router first, followed by the printer. Using a computer connected to the same network, access your router’s admin panel. This is typically done through a web browser by entering the router’s IP address, like 192.168.1.1.
Step 3: Enable USB Printing or Printer Sharing on the Router
Within the router’s settings, locate the section dedicated to USB devices or printing. Enable the option for printer sharing or USB printing function. Save the changes before exiting.
Step 4: Install Printer Drivers on Your Devices
On each device that needs to print, install the correct printer drivers. Your router may provide a specific driver download link or instructions. In some cases, the device will automatically detect the shared printer on the network.
Step 5: Add the Printer to Your Device
Open your device’s printer settings. Choose to add a new printer and select the shared printer from the network list. Complete the installation by following the prompts. Test printing a document to confirm the setup.
Configuring Network Settings for Seamless Printing
Assigning a Static IP Address to the Printer
To maintain stability, assign a static IP address to the printer via your router’s DHCP reservation feature. This prevents the printer’s IP from changing, which can disrupt printing connections.
Enable Printer Sharing on Your Devices
Make sure the sharing settings are enabled on your computers. This allows all authorized devices to detect and communicate with the shared printer without interference.
Troubleshooting Common Connection Issues
Printer Not Recognized or Detectable
- Verify all cables are securely connected.
- Check if the router’s USB port is enabled and supports printing.
- Ensure the printer drivers are correctly installed on your device.
Print Jobs Stuck or Not Printing
- Restart the router, printer, and your device.
- Clear the print queue and resend the print job.
- Update your router’s firmware to fix known bugs.
Router Not Detecting the Printer
- Ensure the USB cable is not faulty.
- Confirm the printer is powered on and set to the correct mode.
- Check for firmware updates on your router that improve USB support.
Additional Tips for Successful Printer Sharing
- Use a high-quality USB cable to avoid connection issues.
- Maintain updated firmware on your router for compatibility.
- Regularly check network and printer settings for optimal performance.
- If your router does not support USB printing, consider using a dedicated print server device or connecting the printer directly to a computer.
Related Topics
Using a Wireless Printer Instead of USB Connection
If your router does not support USB printing, a wireless printer can be an alternative that offers similar convenience without cables. Setup usually involves connecting the printer to Wi-Fi directly or through a computer.
Setting Up an Ethernet Network for Printer Sharing
For larger offices or households, connecting the printer via Ethernet to your router can be more stable. This setup requires a network cable and proper IP configuration but provides reliable printing access.
Understanding Printer Server Devices
Printer servers are dedicated hardware devices enabling printers to connect to a network via Ethernet or USB. They are ideal for printers without built-in network capabilities, providing seamless sharing.
Security Tips for Networked Printers
Always update your router firmware, utilize strong passwords, and restrict access to your network. This helps prevent unauthorized printing or data breaches through your connected printer.
Summary
Connecting your printer to a router’s USB port is an effective way to share printing resources across your network. Make sure your router supports this feature, follow proper setup steps, and configure network settings for optimal operation. Troubleshoot common problems promptly to ensure smooth printing experiences for everyone. With patience and the right equipment, your printer can become a central hub of your printing needs, all accessible via your Wi-Fi network.
Convert any USB Printer to a WiFi Printer
Frequently Asked Questions
What steps should I follow to physically connect my printer to the router’s USB port?
First, locate the USB port on your router and ensure it supports printer sharing. Connect one end of a compatible USB cable to the printer’s USB port and the other end to the router’s USB port. Turn on your printer if it isn’t already powered on. Make sure your router recognizes the connection, which may be indicated by a status light or notification in the router’s management interface.
How can I configure my network settings after physically connecting the printer to the router?
Access your router’s admin panel through a web browser, usually by entering its IP address. Navigate to the USB or printer sharing section, then enable the printer sharing feature. Assign a network name or IP address if needed. Follow the prompts to register the connected printer with the network, ensuring it’s available for other devices to access.
What should I do if the printer isn’t detected by the router after connection?
Verify that the USB cable is securely connected on both ends. Check the printer’s and router’s manuals to ensure compatibility. Restart both devices to refresh their network status. Confirm that the router’s firmware supports printer sharing via USB. If detection issues persist, try using a different USB port or cable, and consult the router’s troubleshooting guide for further steps.
Final Thoughts
Connecting your printer to the router USB port allows shared access for multiple devices. Start by ensuring your printer has a USB connection compatible with your router. Plug the printer into the router’s USB port and turn on both devices.
Access your router’s admin interface to configure the USB printer settings. Follow the prompts to detect and set up the printer on your network.
In conclusion, knowing how to connect printer to router usb port simplifies printing for all devices. Proper setup ensures seamless sharing and efficient printing across your network.

I specialize in process engineering and system optimization. I enjoy writing guides that simplify troubleshooting and help improve efficiency in everyday tech use.