
Connecting your security camera to Wi-Fi is a straightforward process that unlocks remote monitoring and seamless smart home integration. This comprehensive guide simplifies the setup, covering essential preparations, various connection methods like app-based pairing, and crucial troubleshooting tips for common hurdles. By following these clear instructions, you can efficiently get your camera online, guaranteeing reliable surveillance and enhanced security for your property.
How to Connect Security Camera to Wifi
Gone are the days when setting up a home security system meant drilling countless holes and running yards of unsightly cables. Thanks to advancements in wireless technology, connecting a security camera to Wi-Fi has become incredibly simple, making home surveillance accessible to everyone. Whether you’re keeping an eye on your front porch, monitoring your pets, or ensuring the safety of your loved ones, a Wi-Fi-connected security camera offers unparalleled convenience and peace of mind.
The ability to access live footage, receive motion alerts, and control your camera remotely from anywhere in the world is a game-changer. But for many, the initial setup can seem a bit daunting. Don’t worry! This comprehensive guide will walk you through every step of how to connect security camera to Wi-Fi, from preparation to troubleshooting, in a friendly, easy-to-understand manner. You’ll be a Wi-Fi camera pro in no time!
Key Takeaways
- Preparation is Key: Before starting, gather your camera, power adapter, Wi-Fi network name (SSID), and password. Ensure your smartphone or tablet is ready.
- Most Cameras Use 2.4GHz Wi-Fi: Verify your router is broadcasting a 2.4GHz network, as most security cameras are not compatible with 5GHz Wi-Fi.
- App-Based Setup is Standard: The most common method to connect security camera to wifi involves downloading the manufacturer’s app, creating an account, and following the in-app instructions.
- Camera Reset is Often Necessary: If initial pairing fails, performing a factory reset on your camera can resolve many connection issues.
- Strong Wi-Fi Signal is Crucial: Place your camera within optimal range of your router, or consider Wi-Fi extenders/mesh systems for areas with weak signals.
- Troubleshoot Methodically: Check Wi-Fi band, password, signal strength, and restart both camera and router if you encounter problems.
- Keep Firmware Updated: Regularly update your camera’s firmware through its app to ensure optimal performance, security, and compatibility.
Quick Answers to Common Questions
Can I connect my security camera to 5GHz Wi-Fi?
Most consumer security cameras typically only connect to 2.4GHz Wi-Fi networks. While 5GHz offers faster speeds, 2.4GHz provides better range and signal penetration, which is more beneficial for security cameras. Always check your camera’s specifications.
What should I do if my camera won’t connect after multiple attempts?
First, try performing a factory reset on your camera and rebooting your Wi-Fi router. Then, re-attempt the setup process from scratch, ensuring your phone is connected to the 2.4GHz Wi-Fi band and your Wi-Fi password is entered correctly.
Do I need an Ethernet cable to connect a Wi-Fi camera?
Generally, no. Most Wi-Fi cameras connect directly to your router wirelessly. However, some models might offer an Ethernet port for an initial wired setup to configure Wi-Fi, or as a backup wired connection option.
How far can my security camera be from my Wi-Fi router?
The effective range depends on your router’s strength, camera’s antenna, and environmental factors like walls and interference. Typically, for a reliable connection, try to keep the camera within 30-50 feet (9-15 meters) of your router, with minimal obstructions.
What does it mean to “reset” my camera?
Resetting your camera usually means performing a factory reset, which restores it to its original default settings. This clears all previous Wi-Fi configurations and user preferences, allowing you to start the setup process as if it were a new device.
📑 Table of Contents
The Essential Pre-Connection Checklist
Before you even think about connecting your security camera to Wi-Fi, a little preparation goes a long way. Having everything in order will make the setup process smooth and hassle-free.
Gather Your Gear
First things first, make sure you have everything you need within reach:
- Your Security Camera: Unboxed and ready to go.
- Power Adapter: The one that came with your camera.
- Smartphone or Tablet: This will likely be your primary tool for setup.
- Wi-Fi Network Name (SSID): This is the name of your home Wi-Fi network.
- Wi-Fi Password: Make sure it’s accurate and easily accessible.
- Camera’s User Manual: Always a good idea to have it handy for specific instructions.
Understand Your Wi-Fi Network
This is crucial! Most security cameras, especially consumer-grade models, only work with 2.4GHz Wi-Fi networks. They are typically not compatible with 5GHz Wi-Fi, even though 5GHz is faster. Why? Because 2.4GHz offers better range and penetration through walls, which is often more important for a security camera’s placement.
- Check Your Router: Many modern routers broadcast both 2.4GHz and 5GHz networks, sometimes with different names (e.g., “MyHomeWifi” and “MyHomeWifi_5G”). Make sure your phone is connected to the 2.4GHz network during setup.
- Strong Signal: Place your camera relatively close to your Wi-Fi router for the initial setup. You can test the signal strength later.
Power Up Your Camera
Find a power outlet near your router and plug in your security camera. Most cameras will emit a startup sound, blink an indicator light, or rotate as they power on. Give it a moment to boot up fully.
Common Methods to Connect Security Camera to Wifi
Different camera brands and models might have slightly varied connection processes, but they generally fall into a few common categories. Understanding these will help you choose the right approach to connect security camera to Wi-Fi.
The App-Based Setup (Most Popular)
This is by far the most prevalent method. Nearly all modern Wi-Fi security cameras use a dedicated smartphone app provided by the manufacturer. The app guides you through the entire process.

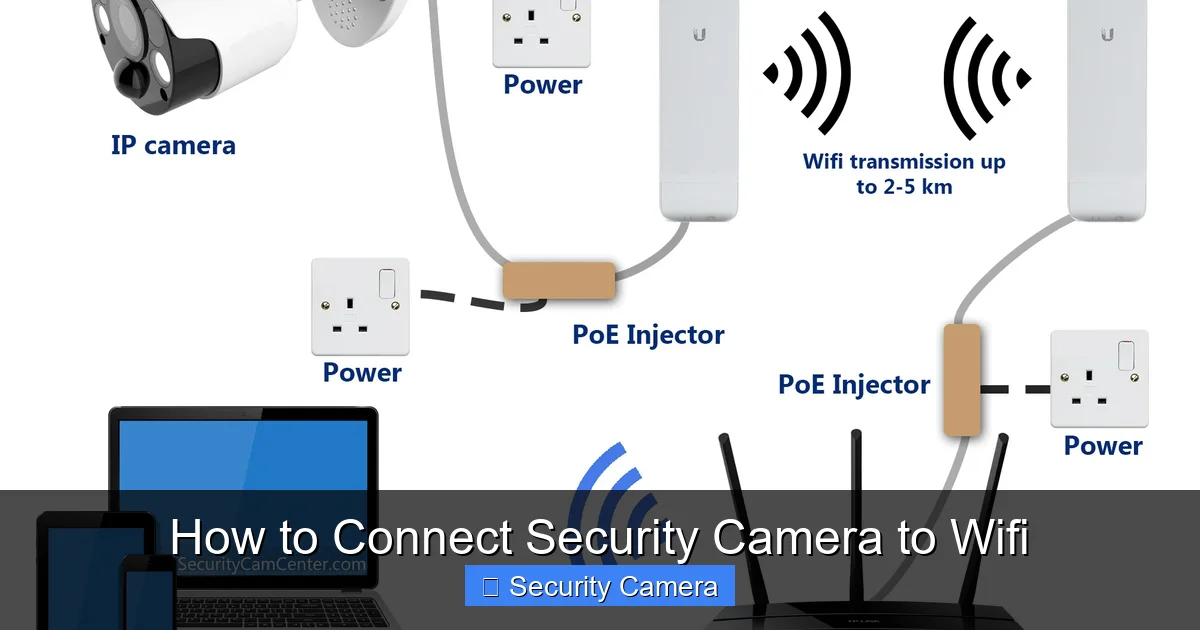
Visual guide about How to Connect Security Camera to Wifi
Image source: videos.cctvcamerapros.com
QR Code Pairing
Some cameras generate a QR code on your phone screen, which you then point your camera lens at. The camera scans the code, reads the Wi-Fi credentials, and connects automatically.
AP Mode or Hotspot Connection
In this method, the camera temporarily creates its own Wi-Fi hotspot (Access Point mode). You connect your phone to this camera-generated Wi-Fi network, and then use the app to pass your home Wi-Fi details to the camera.
Ethernet-First Setup
A few cameras (often those with an Ethernet port) might require you to connect them directly to your router with an Ethernet cable first. Once connected, you use the app to configure the Wi-Fi settings, and then you can unplug the Ethernet cable.
Step-by-Step: Connecting Via the Camera App
Let’s dive into the most common scenario: using the camera’s dedicated app to connect security camera to Wi-Fi.
Step 1: Download and Register
- Find the App: Check your camera’s packaging or manual for the name of the official app. Search for it on the Apple App Store (for iOS) or Google Play Store (for Android).
- Install and Register: Download and install the app. Once opened, you’ll likely need to create an account. Use a strong password and enable two-factor authentication if offered.
Visual guide about How to Connect Security Camera to Wifi
Image source: securitycamcenter.com
Step 2: Power On and Prepare Your Camera
- Plug It In: Connect your camera to power. Wait for it to fully boot up. It might flash lights or make a sound indicating it’s ready for pairing.
- Reset if Needed: If this isn’t a brand-new camera, or if you’ve tried connecting before, perform a factory reset. Most cameras have a small reset button (often recessed, requiring a paperclip) that you press and hold for 5-10 seconds until you hear a prompt or see a light change. This clears previous settings.
Step 3: Initiate the Pairing Process
- Add Device in App: Open the camera app. Look for an option like “Add Device,” “Add Camera,” or a “+” icon.
- Select Your Camera Model: The app might ask you to select your specific camera model from a list or scan a QR code on the camera itself.
- Choose Connection Method: The app will then guide you to choose a connection method (e.g., “Wi-Fi Connection,” “QR Code Scan,” “AP Mode”). Select the one that matches your camera’s capabilities and the app’s prompt.
Step 4: Configure Wi-Fi Settings
- Confirm 2.4GHz Network: The app will usually show the Wi-Fi network your phone is currently connected to. Ensure it’s your 2.4GHz home network. If not, switch your phone’s Wi-Fi connection.
- Enter Wi-Fi Password: Carefully type in your Wi-Fi password. Double-check for typos, as this is a common error.
- Follow Pairing Prompts: This is where the specific method comes in:
- For QR Code: The app will generate a QR code. Hold your phone screen about 4-8 inches in front of your camera’s lens until the camera confirms it has read the code (you might hear a chime).
- For Sound Pairing: The app might ask you to place your phone near the camera as it emits a special sound that transmits the Wi-Fi details.
- For AP Mode: The app will instruct you to go to your phone’s Wi-Fi settings and connect to the camera’s temporary hotspot (e.g., “IPC-XXXXX”). Once connected, return to the app to complete the setup.
Step 5: Finalize Setup and Test
- Wait for Connection: The camera will attempt to connect to your Wi-Fi network. This might take a minute or two. The camera’s indicator light usually changes (e.g., from flashing red to solid green) and you might hear a confirmation voice prompt.
- Name Your Camera: Once connected, the app will usually ask you to give your camera a name (e.g., “Front Door Camera,” “Living Room”).
- Test Functionality: Check the live view, motion detection, and other features through the app to ensure everything is working correctly.
Troubleshooting Common Wi-Fi Connection Issues
Sometimes, things don’t go perfectly the first time. Don’t get frustrated! Most issues when trying to connect security camera to Wi-Fi are easily solvable.
Check Your Wi-Fi Signal
A weak signal is a primary culprit. If the camera is too far from your router or there are many obstructions, it might struggle to connect or maintain a stable connection. Try moving the camera closer to the router temporarily to see if it connects.
Verify Wi-Fi Band (2.4GHz vs. 5GHz)
As mentioned, most cameras need 2.4GHz. Ensure your phone is connected to the 2.4GHz network during setup. If your router combines both bands into one name, try temporarily disabling the 5GHz band in your router settings (if you know how) or creating a separate SSID for 2.4GHz.
Double-Check Your Password
This might seem obvious, but a mistyped Wi-Fi password is an incredibly common problem. Passwords are case-sensitive! Try typing it into a notepad first to ensure accuracy before pasting or re-typing it into the camera app.
Reset the Camera and Router
A simple reboot can work wonders.
- Camera Reset: Perform a factory reset on your camera (usually a small button, hold for 5-10 seconds).
- Router Reset: Unplug your Wi-Fi router from power, wait 30 seconds, and plug it back in. Wait for it to fully boot up (5-10 minutes) before trying to connect your camera again.
Router Settings and Firmware Updates
- DHCP Enabled: Ensure your router’s DHCP server is enabled, as this assigns IP addresses to devices.
- MAC Address Filtering: If you have MAC address filtering enabled on your router, you’ll need to add your camera’s MAC address to the allowed list. This information can usually be found on a sticker on the camera or in its manual.
- Firewall/Port Forwarding: For basic connections, this usually isn’t necessary, but if advanced features aren’t working, consult your camera’s manual or support for specific port requirements.
- Camera Firmware: Ensure your camera’s firmware is up to date through its app. Old firmware can cause compatibility issues.
Optimizing Your Wi-Fi for Seamless Camera Performance
Once you successfully connect security camera to Wi-Fi, you want to ensure it stays connected and performs reliably.
Strategic Router Placement
The closer your camera is to your Wi-Fi router, the better the signal will be. If possible, place your router in a central location, away from large metal objects, thick walls, and other electronics that can cause interference.
Consider Wi-Fi Extenders or Mesh Systems
For larger homes or areas with dead zones, a Wi-Fi extender can boost your signal, or a mesh Wi-Fi system can provide seamless coverage across your entire property. Look for extenders that support 2.4GHz for compatibility with most cameras.
Dedicate a 2.4GHz Network (Optional but Helpful)
If your router broadcasts both 2.4GHz and 5GHz under a single SSID, it can sometimes confuse devices. If your router allows, create a separate name for your 2.4GHz network (e.g., “MyHomeWifi_2.4G”). This ensures your camera connects to the correct band consistently.
Regular Maintenance
Occasionally rebooting your router and cameras can help clear out network glitches and refresh connections, ensuring optimal performance. Also, always keep your camera’s firmware updated for security patches and improved functionality.
Ensuring Your Camera Stays Secure Online
Connecting your camera to Wi-Fi also means it’s connected to the internet. Here’s how to keep it safe.
Strong Passwords & Two-Factor Authentication
Always use unique, complex passwords for your camera app account and your Wi-Fi network. Enable two-factor authentication (2FA) in the camera app if available, adding an extra layer of security.
Regular Firmware Updates
Manufacturers frequently release firmware updates to patch security vulnerabilities and improve performance. Make it a habit to check for and install these updates through your camera’s app.
Conclusion
Connecting your security camera to Wi-Fi is a straightforward process that empowers you with enhanced home security and remote monitoring capabilities. By following the steps outlined in this guide – from careful preparation and understanding your camera’s connection method to diligent troubleshooting and network optimization – you can successfully get your camera online and working efficiently. Remember, a stable Wi-Fi connection is the backbone of a reliable wireless security system. Now that you know how to connect security camera to Wi-Fi, you can enjoy the peace of mind that comes with keeping a watchful eye on what matters most, anytime, anywhere.
Frequently Asked Questions
What if my router has both 2.4GHz and 5GHz networks with the same name?
If your router uses a single SSID for both bands, try temporarily disabling the 5GHz band in your router settings during setup. Alternatively, check if your router allows you to create separate names (SSIDs) for each band, like “MyHomeWifi_2.4G” and “MyHomeWifi_5G”, and then connect your camera to the 2.4GHz one.
Why does my camera keep losing its Wi-Fi connection?
Frequent disconnections often point to a weak Wi-Fi signal, interference from other devices, or an overloaded network. Try moving the camera closer to your router, reducing network congestion, or considering a Wi-Fi extender or mesh system to boost signal strength in that area.
Is it safe to connect my security camera to public Wi-Fi?
No, it is highly recommended to only connect your security camera to a secure, private Wi-Fi network. Public Wi-Fi networks are often unsecured and can expose your camera to potential security risks, including unauthorized access and data breaches.
Can I connect multiple security cameras to the same Wi-Fi network?
Yes, most home Wi-Fi networks can comfortably support multiple security cameras. However, keep in mind that each camera uses bandwidth, so a large number of cameras streaming high-quality video simultaneously might strain your network, especially if your internet speed is limited.
What if my camera’s app isn’t recognizing the camera during setup?
Ensure your camera is powered on and in pairing mode (often indicated by a specific flashing light). Double-check that your smartphone is connected to the correct 2.4GHz Wi-Fi network. If issues persist, try restarting both your camera and router, and ensure your app is the latest version.
Do Wi-Fi security cameras require a subscription?
It depends on the camera and manufacturer. Many Wi-Fi cameras offer basic features like live viewing and local storage (via an SD card) for free. However, advanced features such as cloud storage, AI-powered motion detection, and extended video history often require a paid subscription plan.

With experience in IT support and consumer technology, I focus on step-by-step tutorials and troubleshooting tips. I enjoy making complex tech problems easy to solve.