To enable IPv6 on your router, access your router’s settings via its IP address, navigate to the network or internet section, and activate IPv6 support. Make sure your ISP supports IPv6, then configure the necessary parameters or select the auto-configuration option. Save your settings, and you’re all set!
Enabling IPv6 on your router today is easier than you might think. The process involves logging into your router’s admin panel, turning on IPv6 support, and ensuring everything is configured correctly for your network. With more devices and services moving to IPv6, it’s a smart move to prepare your network for the future. Whether you’re a tech enthusiast or just looking to keep your home network up-to-date, this step-by-step guide will walk you through the simple process of turning on IPv6 so you can enjoy faster, more secure connectivity. No need to be a network expert—just follow along!

How to Enable IPv6 on Router: A Complete Guide
Understanding IPv6 and Its Importance
IPv6 is the latest version of Internet Protocol that allows devices to connect to the internet with unique addresses. It replaces IPv4, which has limited address space and is running out of available addresses. Enabling IPv6 on your router ensures that your network can handle more devices and improves overall internet performance.
IPv6 offers several benefits including enhanced security, better support for mobile devices, and simplified network management. Many internet service providers now support IPv6, making it essential for modern networking. Knowing how to enable IPv6 on your router will prepare you for the future of internet connectivity.
Check if Your Internet Service Provider Supports IPv6
Before you try to enable IPv6, verify if your ISP offers IPv6 connectivity. Some providers automatically enable IPv6 as part of their service, while others require you to request it explicitly. To check this:
- Visit your ISP’s website or contact customer support.
- Look for information about IPv6 support or IPv6 settings.
- Test your current connection using online tools like test-ipv6.com.
If your ISP supports IPv6, you can proceed with enabling it on your router. If not, you might need to consider switching providers or exploring alternative methods like tunneling.
Accessing Your Router’s Admin Panel
The first step to enable IPv6 involves logging into your router’s settings. Typically, you access the admin panel via a web browser. Use the default IP address of your router, such as 192.168.1.1 or 192.168.0.1.
To access your router:
- Open your preferred web browser.
- Enter the router’s IP address into the address bar.
- Log in using your username and password. If you haven’t changed these, the default credentials are often found on the router’s label or in the manual.
Remember to update your login credentials later for security reasons.
Navigating to IPv6 Settings in Your Router
Once logged in, locate the section dedicated to network or internet settings. This varies depending on your router’s brand and model.
Common navigation paths include:
- Advanced Settings > IPv6
- Network > IPv6
- Internet Settings > IPv6 Configuration
If you cannot find IPv6 options, consult your router’s user manual or manufacturer’s website for specific instructions.
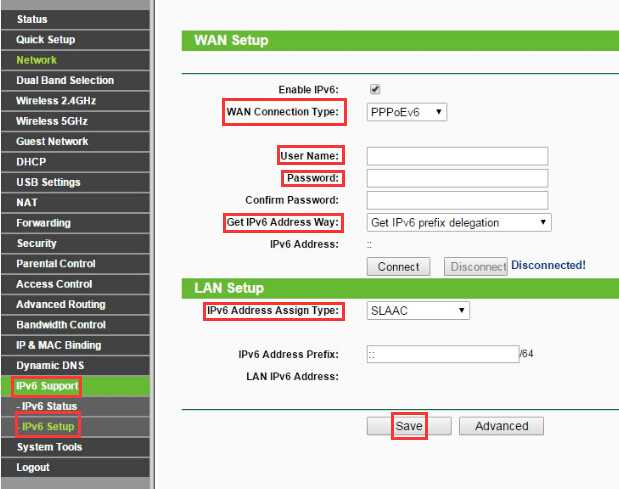
Enabling IPv6 on Your Router
Activating IPv6 typically involves a simple toggle or selection from available options. The key settings include:
- IPv6 Connection Type
- IPv6 Addressing Mode
- Prefix Delegation
The main connection types are:
Automatic or DHCPv6
This setting allows your router to automatically obtain IPv6 addresses from your ISP. It’s the most common and easiest option to set up.
Static IPv6
Here, you manually enter the IPv6 address provided by your ISP. This method requires more technical knowledge and specific address details.
PPPoE with IPv6
For some ISPs, particularly DSL connections, you may need to enable PPPoE with IPv6 support.
Ensure you select the option recommended by your ISP to avoid connectivity issues.
Configuring IPv6 Addressing and Prefix Delegation
Most modern routers support prefix delegation, which assigns a subnet to your network automatically. This simplifies the setup process.
If you choose DHCPv6 or automatic configuration:
- Enable DHCPv6
- Specify whether to assign addresses automatically or manually
- Set the prefix delegation size (usually /64 for home networks)
This setup enables devices on your network to receive IPv6 addresses seamlessly.
Applying and Saving Changes
After configuring the settings, click the “Save” or “Apply” button. Your router may restart to apply changes, and the process might take a few moments.
Verify if the settings are working by checking the router’s status page or using IPv6 testing tools. Confirm that IPv6 addresses are assigned to devices connected to your network.
Configuring Devices and Network Settings for IPv6
Once your router supports IPv6, ensure your connected devices can use the protocol. Most modern operating systems, like Windows, Mac, Android, and iOS, support IPv6 automatically.
You might need to:
- Enable IPv6 in device network settings.
- Update network drivers and operating system firmware.
- Assign static IPv6 addresses for specific devices if needed.
Testing your devices’ IPv6 connectivity can be done through online tools or command prompts, using commands like “ping -6” or “ipconfig /all”.
Troubleshooting Common IPv6 Setup Issues
If you encounter problems, review your configuration:
- Check whether your ISP supports IPv6 and confirms your account setup.
- Ensure the correct connection type is selected on your router.
- Verify that the IPv6 prefix delegation or address is properly assigned.
- Reboot the router and devices after configuration changes.
Consult your router’s manual or online forums for model-specific troubleshooting tips.
Enhancing Network Security with IPv6
Enabling IPv6 introduces new security considerations. Make sure to:
- Update your router’s firmware to the latest version.
- Configure firewalls to support IPv6 traffic properly.
- Disable any unnecessary IPv6 features to minimize vulnerabilities.
Proper security practices ensure your network remains protected while using IPv6.
Related Topics: IPv6 and Network Management
Understanding IPv6 opens avenues for better network management. You can explore topics like:
- Implementing IPv6 DNS servers
- Using IPv6 VPNs for secure remote access
- Managing IPv6 address space and subnetting
These skills facilitate efficient network administration and future growth.
Final Tips for Enabling IPv6 on Your Router
Always back up your router configuration before making significant changes. Keep your device’s firmware updated for the latest features and security patches.
Test your setup with reputable IPv6 testing tools to confirm connectivity. Regularly monitor your network for issues and optimize settings as needed.
Enabling IPv6 on your router might seem complex initially, but following these steps ensures a smooth transition. Staying updated with IPv6 developments will help you make the most of internet advancements now and in the future.
Enabling and configuring IPv6 on a Cisco router
Frequently Asked Questions
What are the initial steps to enable IPv6 on a router?
Begin by accessing your router’s administrative interface through a web browser. Log in with your administrator credentials. Navigate to the network settings or advanced setup section. Look for IPv6 options, and ensure that the feature is activated or enabled. Save your changes before proceeding to configure specific IPv6 parameters if needed.
How can I verify that IPv6 is properly enabled on my router?
After enabling IPv6, connect a device to your network and check its network settings for IPv6 addresses. You can also visit websites like test-ipv6.com or ipv6-test.com to confirm that your connection supports IPv6. Additionally, use command-line tools such as ‘ping’ or ‘tracert’ with IPv6 addresses to test connectivity.
What configuration settings are necessary for an IPv6-enabled router?
Configure your router with the appropriate IPv6 address assignment method, such as DHCPv6 or SLAAC, based on your ISP’s requirements. Set up DNS servers that support IPv6, and enter any specific IPv6 prefix provided by your internet provider. Ensure that firewall rules and security settings accommodate IPv6 traffic to maintain network safety.
Is it possible to enable IPv6 on a dual-stack router, and how do I do it?
Yes, most dual-stack routers support both IPv4 and IPv6 simultaneously. To enable IPv6, locate the IPv6 settings in your router’s configuration, enable the feature, and select the appropriate address assignment method. Confirm that both IPv4 and IPv6 are active in the network status page, and test connectivity for both protocols.
What common issues might prevent IPv6 from functioning correctly after setup?
Problems often arise from incorrect configuration settings, such as wrong IPv6 prefix or DNS details. Firmware compatibility issues can also cause problems; ensure your router’s firmware is up-to-date. Additionally, some ISPs require specific settings; verify your ISP’s requirements and consult their support if issues persist.
Final Thoughts
Enabling IPv6 on your router involves accessing the admin panel and navigating to the network settings. Activate the IPv6 option and configure it according to your ISP’s instructions. Save the settings to apply the changes.
To ensure proper connectivity, restart your router after enabling IPv6 on your router. Verify the configuration by checking it on a device connected to the network. This quick step confirms your IPv6 setup is successful.
In conclusion, how to enable ipv6 on router is straightforward with these simple steps. Follow the instructions carefully to ensure you enable ipv6 effectively and enjoy the benefits of the latest internet protocol.

I specialize in process engineering and system optimization. I enjoy writing guides that simplify troubleshooting and help improve efficiency in everyday tech use.


