To install a Wi-Fi router quickly, start by unboxing your device, connecting it to your modem via the Ethernet cable, powering it on, and then configuring the Wi-Fi settings through the setup process or web interface. That’s it! With a few simple steps, you’ll have your home network up and running in no time.
In short, installing a Wi-Fi router involves connecting it to your modem, powering it up, and configuring your wireless network settings. By following these straightforward steps, you can ensure a smooth setup without any fuss. Whether you’re a tech novice or just need a refresh, setting up your Wi-Fi router doesn’t have to be complicated. Just grab your device, follow the instructions, and enjoy a reliable wireless connection. Now, let’s walk through each step in detail so you can get online effortlessly!

How to Install WiFi Router Step by Step
Preparing for the Installation
Before you begin installing your WiFi router, gather all the necessary tools and equipment. Ensure you have the router, power adapter, Ethernet cables, and any included installation guides. A clear workspace helps you focus and prevents misplacing small components during setup.
Check Your Internet Service Connection
Make sure your internet service is active and functioning correctly. Contact your internet provider if you’re unsure about your account status or if there are any outages in your area. Knowing your account details, such as username and password, can be helpful during setup.
Selecting the Right Location for Your Router
Choose a central spot in your home for optimal coverage. Keep the router away from thick walls, metal objects, and appliances that emit electromagnetic signals. Elevating the router on a shelf or high surface improves signal distribution throughout your space.
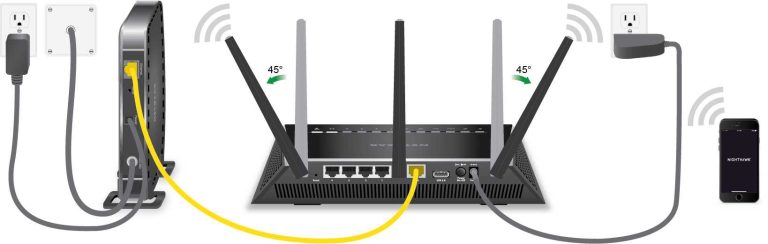
Connecting Your Router
Once you have prepared your space, it’s time to physically connect the router. Use an Ethernet cable to connect the modem to the router’s WAN or internet port. Ensure both the modem and router are unplugged before making connections to avoid electrical issues.
Connecting the Power Supply
Plug the power adapter into your router and then into an electrical outlet. Turn on the router by pressing the power button if it has one. Wait a few moments for the router to boot up fully; indicator lights will stabilize indicating readiness.
Configuring Your Wireless Network
After physical connection, you need to set up your WiFi network’s settings. This includes naming your network and securing it with a password. Use a computer or mobile device to access the router’s configuration page to perform these tasks.
Accessing the Router’s Admin Panel
Open a web browser and type the default IP address of your router, typically something like 192.168.0.1 or 192.168.1.1. Refer to your router’s manual if these addresses do not work. Enter the default username and password, often found on a sticker on the device.
Changing Default Settings
Once logged in, change the default login credentials to prevent unauthorized access. Navigate to the wireless settings to set your preferred network name (SSID) and create a strong password. Enable WPA3 or WPA2 security for optimal protection.
Configuring Wireless Settings for Optimal Performance
Fine-tuning your WiFi settings can improve signal strength and speed. Adjust the channel and bandwidth to reduce interference, especially if you have many devices or neighboring networks overlapping.
Setting Up Guest Networks
To keep your main network secure, consider creating a separate guest network. This allows visitors to access the internet without gaining access to your personal devices or files. Enable guest network features through your router’s admin panel.
Enabling Quality of Service (QoS)
QoS prioritizes bandwidth for specific activities like streaming or gaming. Enable QoS in your router settings to ensure smooth performance during high-demand tasks. This feature helps prevent lag and buffering issues.
Securing Your WiFi Network
Security is vital to protect your network from unauthorized users and potential threats. Use a strong, unique password and regularly update your router’s firmware to patch any vulnerabilities.
Updating Router Firmware
Visit the manufacturer’s website to check for firmware updates. Download and install the latest version to improve performance and security. Follow the instructions carefully to avoid disrupting your network.
Enabling Firewall Settings
Activate your router’s built-in firewall to block malicious traffic. Adjust settings based on your security needs, and disable any unnecessary services that could open security gaps.
Testing Your WiFi Connection
After completing setup, verify your WiFi connection’s speed and coverage. Use speed test websites or apps to measure download and upload speeds. Walk around your home to check for dead zones or weak signals.
Using WiFi Analyzer Tools
Mobile apps like WiFi Analyzer help identify the best channels and identify interference sources. These tools guide you in optimizing your network for consistent performance across all areas.
Troubleshooting Common Issues
If your WiFi isn’t working correctly, restart your router and modem. Check connections and settings, and ensure your device is connected to the correct network. Consult your router manual or contact support if problems persist.
Maintaining Your WiFi Router
Regular maintenance can keep your home network secure and reliable. Schedule firmware updates, periodically change passwords, and monitor connected devices for any suspicious activity.
Rebooting the Router
If your internet slows down or disconnects, a quick reboot often resolves the issue. Turn off the router, wait 10 seconds, then turn it back on. This refreshes network connections and clears temporary glitches.
Understanding Router Placement and Signal Boosters
Re-position your router if coverage is uneven. Consider using WiFi extenders or mesh systems to expand coverage in larger homes or tricky dead zones. These devices help ensure a strong connection everywhere.
Related Topics for Better WiFi Performance
Learn about different types of routers, the benefits of mesh networks, and tips for reducing bandwidth congestion. These insights help you optimize your home network for all your online needs.
Choosing the Right Router for Your Home
Select a router that matches your internet speed and device load. Features like dual-band or tri-band support, multiple antennas, and advanced security options improve your overall experience.
Understanding WiFi Frequencies and Channels
Familiarize yourself with 2.4 GHz and 5 GHz bands. The 2.4 GHz band offers broader coverage but lower speeds, while 5 GHz provides faster speeds over shorter distances. Selecting the right channel minimizes interference.
Monitoring Network Security
Regularly review connected devices and update security settings. Enable network encryption, disable remote management if unnecessary, and create guest networks for visitors to enhance protection.
By following these detailed steps, you can confidently install your WiFi router and create a strong, secure wireless network in your home. Proper setup ensures fast speeds, reliable coverage, and safety from unwanted intruders, making your internet experience seamless and enjoyable.
THE EASIEST WIRELESS ROUTER SETUP GUIDE!
Frequently Asked Questions
What are the initial preparations needed before installing a Wi-Fi router?
Before starting the installation, gather all necessary equipment such as the router, power adapter, Ethernet cables, and any provided setup guides. Ensure your modem is functioning properly and placed in a central location for better coverage. Clear the area where you plan to set up your router to avoid obstructions, and check your internet subscription details to confirm the login credentials if needed. Having these ready will make the process smoother and quicker.
How should I connect my Wi-Fi router to the modem and power source?
Connect one end of an Ethernet cable to your modem and the other end to the WAN port on your router. Make sure the connection is secure. Then, plug the router’s power adapter into an electrical outlet and connect it to the router’s power port. Turn on the modem first, wait for it to fully initialize, then power on the router. Wait for the indicator lights to stabilize, signaling that the device is ready for use.
What configuration steps are necessary after physically setting up the router?
Access your router’s setup page by opening a web browser and entering its default IP address, typically found on the device or in the manual. Log in using the default username and password, then follow the on-screen instructions to change the administrator credentials for security. Proceed to set your Wi-Fi network name (SSID) and create a strong password. Save your settings and restart the router if prompted to ensure all configurations take effect properly.
How can I optimize my Wi-Fi signal after installation?
Position your router in a central location away from walls, metal objects, and electronic devices that may cause interference. Elevate the router on a shelf or a high piece of furniture for better coverage. Use the latest Wi-Fi security protocols like WPA3 or WPA2 to protect your network. Additionally, consider adjusting the Wi-Fi channel through the settings to reduce congestion from nearby networks, which can improve connection quality.
Final Thoughts
To install a wifi router step by step, start by choosing a central location away from interference. Connect the router to your modem using an Ethernet cable. Power on the device and access its setup page through a browser. Follow the on-screen instructions to configure your network settings. Once setup completes, connect your devices and enjoy seamless internet access. By following these simple steps, you can easily install a wifi router step by step and ensure a reliable connection throughout your space.

I specialize in process engineering and system optimization. I enjoy writing guides that simplify troubleshooting and help improve efficiency in everyday tech use.