To set up a portable monitor with a switch, connect your monitor to the switch using an HDMI or DisplayPort cable, then connect the switch to your gaming console, PC, or other devices. Configure the switch settings to recognize multiple inputs, and select the desired display source when needed. This simple setup allows you to switch seamlessly between devices, creating a flexible and portable workspace or gaming setup.
In just a few steps, you can enjoy a versatile and clutter-free setup by linking your portable monitor to a switch. First, connect the monitor to the switch, then connect your devices to the switch’s inputs. Next, adjust the switch’s settings to recognize multiple inputs, and use the switch button or remote to toggle between devices effortlessly. It’s an easy, efficient way to expand your display options on the go.
Getting your portable monitor up and running with a switch is straightforward, but it’s important to start with the right equipment and connection setup. Making this work smoothly means choosing a compatible switch—preferably one with multiple input options—and ensuring your monitor supports the required ports. Just connect your devices to the switch, link the monitor, and you’re all set to switch between screens quickly. Whether for work, gaming, or entertainment, this setup enhances your flexibility and saves space, transforming your portable monitor into a powerful extension of your device ecosystem.

How to Setup Portable Monitor with Switch
Setting up a portable monitor with a Nintendo Switch might seem complex at first, but with the right steps, it’s straightforward. This guide will walk you through every stage of connecting your portable monitor to your Switch efficiently, ensuring a smooth gaming experience. Whether you’re on the go or at home, understanding this setup process helps you enjoy larger visuals and better gameplay.
Understanding Your Equipment
Before beginning the setup, it’s important to familiarize yourself with the components involved. Knowing what type of portable monitor you have and the kind of Switch you own will make the process easier. Common portable monitors utilize USB-C or HDMI connections, while the Switch can output video in different ways depending on the model.
Types of Portable Monitors Compatible with Switch
- USB-C Monitors: These are popular because they can connect directly via a USB-C cable.
- HDMI Monitors: Some portable monitors have an HDMI port, making them compatible with Switch models that support HDMI output.
- Adapters Needed: In cases where the monitor or Switch doesn’t have a matching port, adapters such as USB-C to HDMI or HDMI to USB-C are essential.
Checking Your Nintendo Switch Model
– Standard Switch: Supports HDMI output via the Dock or via a compatible USB-C port for portable use.
– Switch Lite: Does not support video output to external displays without additional hardware. Only the standard Switch supports direct video output.
Gathering the Right Cables and Adapters
Having the correct cables and adapters on hand is crucial for a seamless connection. Here are some options:
Essential Cables and Accessories
- USB-C to USB-C Cable: Best for connecting modern portable monitors that support USB-C input.
- HDMI Cable: Necessary for HDMI-compatible monitors and Switch models with HDMI output capability.
- USB-C to HDMI Adapter: Use this if your monitor has HDMI but your Switch only has USB-C port.
- Power Source: Portable monitors often require their own power supply, so a portable charger or power bank may be needed.
Connecting the Portable Monitor to Nintendo Switch
Once you have all the components, follow these steps to connect your Switch to the portable monitor:
Step-by-Step Connection Process
- Ensure your portable monitor is powered on or connected to a power source.
- Connect your Switch to the monitor using the appropriate cable—either USB-C or HDMI.
- For USB-C connections, plug the cable into the Switch dock and the monitor’s USB-C port.
- For HDMI setups, connect the HDMI cable from the Switch dock to the monitor’s HDMI port.
- Switch on the portable monitor. It should automatically display the Switch’s output.
- If the display remains blank, double-check connections and ensure the monitor is set to the correct input source.
Configuring Your Switch for External Display
After physically connecting, some settings adjustments might be required:
Enabling Video Output
– For standard models, video output is automatic when connected to a compatible monitor.
– If your Switch doesn’t display on the monitor, go to “System Settings” > “TV Output” and verify that the output is enabled and set correctly.
– Adjust the “Resolution” setting if the display is not appearing correctly, choosing a lower resolution if necessary.
Optimizing Display Settings
– Access “Display Settings” on your Switch to tweak screen size and aspect ratio.
– Some portable monitors support different aspect ratios; matching these ensures the image isn’t stretched or cut off.
– Turn on “Docked Mode” if your Switch is in TV mode for better compatibility.
Troubleshooting Common Issues
Even with the right setup, problems can occur. Here are solutions to common issues:
No Signal or Blank Screen
– Confirm all cables are firmly connected and compatible.
– Switch the monitor input source manually if it doesn’t detect automatically.
– Restart your Switch and monitor to reset the connection.
Poor Image Quality or Lag
– Check the resolution settings on your Switch and monitor.
– Use shorter or higher-quality cables to reduce signal degradation.
– Ensure your monitor supports high refresh rates compatible with gaming.
Power Problems
– Portable monitors might need extra power; connect them to a reliable power bank.
– Ensure the power source provides enough voltage and current rated for your monitor.
Additional Tips for a Better Experience
– Use a sturdy stand or mount for your portable monitor to improve viewing comfort.
– Keep cables organized to avoid accidental disconnections.
– Regularly update your Switch and monitor firmware for optimal performance.
– Consider a portable monitor with built-in speakers or audio output for sound without additional accessories.
Related Topics
Using External Accessories with Portable Monitors
– External speakers or headphones can improve audio quality.
– Keyboard and mouse support if you plan to use your portable monitor for productivity.
– Additional USB hubs for connecting multiple devices.
Choosing the Best Portable Monitor for Switch Setup
– Size and weight balance for portability.
– Battery life if using without power sources.
– Compatibility with your Switch model and other devices.
Maintaining and Caring for Your Equipment
– Keep cables and ports clean from dust.
– Store your monitor in a protective case.
– Avoid exposing devices to extreme temperatures or moisture.
By understanding these detailed steps and tips, setting up your portable monitor with your Nintendo Switch becomes simple. Taking the time to select the right equipment and follow proper connection procedures ensures smooth gameplay anywhere you go.
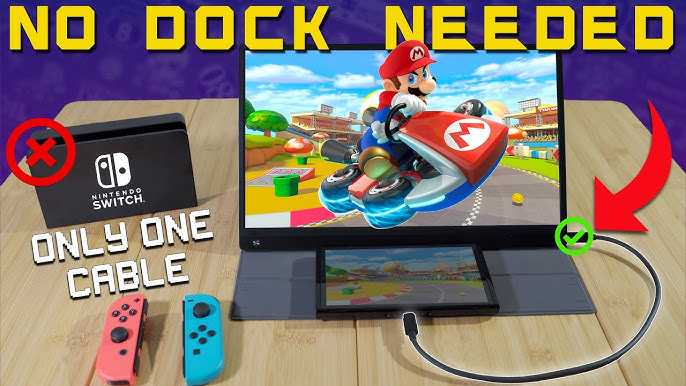
Do you know this tip about the portable monitor #portablemonitor #nintendoswitch
Frequently Asked Questions
What cables are needed to connect a portable monitor to a Nintendo Switch?
You need a compatible HDMI cable to connect the portable monitor to the Nintendo Switch, especially if the monitor has HDMI input. If your monitor supports USB-C with DisplayPort or HDMI, choose the appropriate cable based on the input options. Additionally, if your Switch is in TV mode, you might need a dock or an HDMI adapter to connect it to the monitor.
Can I use a portable monitor with a Nintendo Switch while charging it at the same time?
Yes, many portable monitors support pass-through charging through USB-C or HDMI with an integrated power connection. To keep your Switch charged during use, connect it to a power source via the monitor’s USB-C port (if available) or connect an external power source directly to the Switch or its dock. Ensure your monitor supports power delivery if you want to charge while using.
How do I adjust display settings on the portable monitor when used with the Switch?
Power on the Switch and the monitor, then navigate to the display settings on your console. You can change the resolution or aspect ratio to optimize the viewing experience. Many portable monitors have physical buttons or menu options to adjust brightness, contrast, or aspect ratio directly on the device. Fine-tuning these settings ensures the display looks sharp and clear.
Is it possible to use a portable monitor with the Switch in handheld mode?
Using a portable monitor typically requires connecting the Switch in its docked or TV mode. In handheld mode, the Switch’s built-in screen is active, and it’s not designed to output display to an external monitor without removing the screen and connecting it via compatible adapters, which is impractical. For a larger display, using the Switch in docked mode is recommended.
What steps should I follow to set up a portable monitor for gaming on the Switch?
First, connect the monitor to the Switch using the appropriate cable (HDMI or USB-C). Power on the monitor. Switch your Switch to docked mode if necessary. Access the display settings on the console to adjust resolution and display preferences. Ensure the monitor receives power, and verify the connection is stable. Finally, start your game and enjoy the larger display experience.
Final Thoughts
To set up a portable monitor with Switch, connect the monitor to a power source and turn it on. Use an HDMI or USB-C cable to link the monitor to your Switch. Ensure the Switch is in docked mode for seamless display.
Adjust the monitor settings if needed for optimal picture quality. Confirm all connections are secure before gaming.
In conclusion, knowing how to setup portable monitor with switch simplifies your gaming experience. Follow these steps to enjoy a larger screen on the go effortlessly.

I follow the latest trends in smart devices, portable monitors, and gaming accessories. My goal is to provide real-world insights that help readers make smarter tech decisions.