To set up a router’s time schedule, access its admin panel, find the scheduling or parental controls section, and specify the times you want the internet to be active or blocked. With a few clicks, you can automate your network to suit your family’s routine or work hours, making your online experience more efficient and secure.
A quick answer is: log into your router’s settings, locate the schedule or time-management feature, and set the desired time slots for internet access. Save the changes, and your router will automatically follow the schedule you’ve defined. This ensures better control over your network without the need to manually turn it on or off.
Navigating the process of setting up a router’s time schedule might seem daunting at first, but it’s more straightforward than you think. Whether you’re aiming to limit internet access during certain hours or ensure your children stay safe online, configuring a schedule can help you maintain a balanced digital environment. Most modern routers come equipped with user-friendly interfaces that allow you to customize access times easily. In this guide, we’ll walk through simple steps to enable and configure your router’s time schedule, so you can automate your network management and enjoy peace of mind knowing your internet usage is under control when you need it most.

How to Setup Router Time Schedule
Setting up a router time schedule is an important step to control your internet access. It helps you manage when devices can connect to the internet, improving security and saving bandwidth. This guide will walk you through the process in simple, clear steps.
Understanding Router Time Schedule
A router time schedule allows you to specify time periods when the internet is accessible or restricted. By creating a schedule, you can limit when certain devices connect, which is useful for managing screen time or preventing late-night internet use.
Most modern routers offer time scheduling features, but the options may vary depending on the brand and model. Knowing how to set up this feature helps you maintain better control over your home network.
Why Use a Router Time Schedule?
Implementing a schedule provides several benefits. It enhances security by preventing unwanted access during certain hours. It can also help with household rules, such as limiting internet use for children.
Additionally, a schedule can reduce unnecessary bandwidth usage during off-hours. This means faster internet speeds during active times and saves on data costs if you have a limited plan.
Prerequisites and Preparation
Before starting, ensure you have access to your router’s admin credentials. Usually, the username and password are on a sticker at the back or in the manual.
It’s also helpful to know your desired schedule times, such as when to allow or block internet access for specific devices. Keep this information handy for a smoother setup process.
Accessing Your Router Settings
First, connect your device to the router via Wi-Fi or Ethernet cable. Then, open a web browser and type your router’s IP address, often 192.168.1.1 or 192.168.0.1, into the address bar.
Log in using your admin username and password. If you haven’t changed these before, check your router’s manual or the label on the device for default login details.
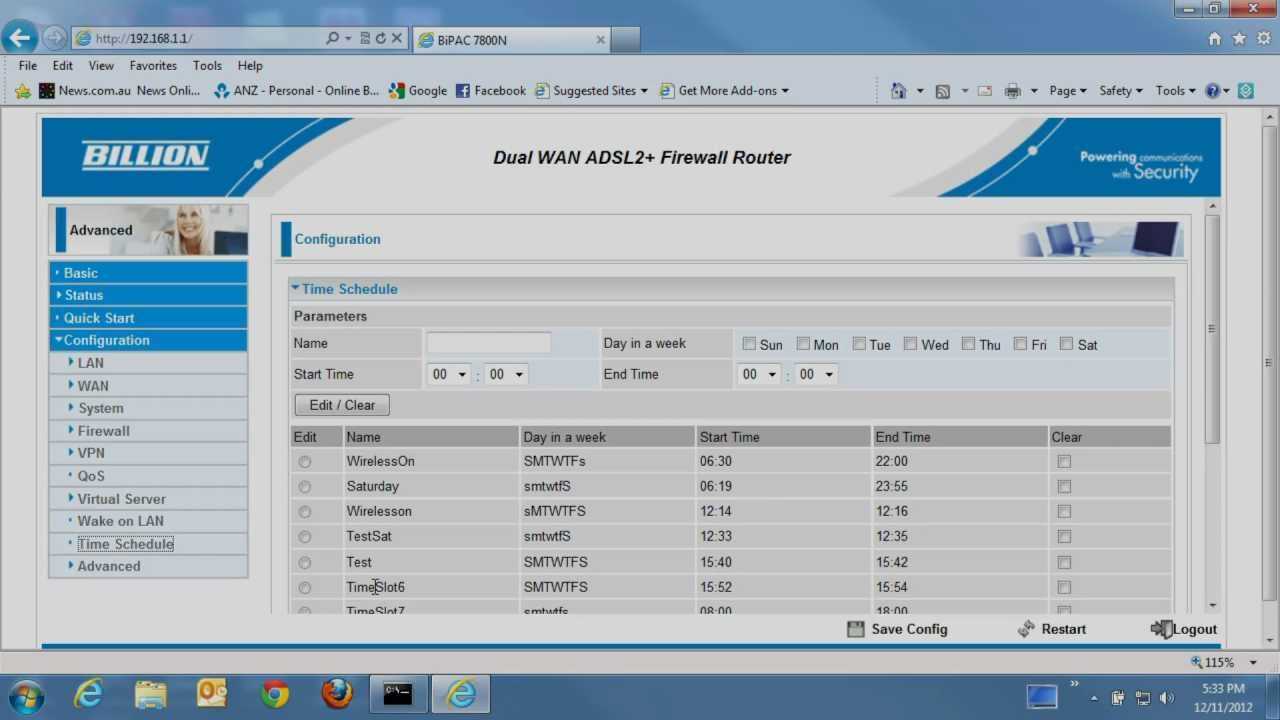
Navigating to the Time Schedule Settings
Once logged in, look for sections labeled as “Advanced Settings,” “Parental Controls,” or “Access Restrictions.” The exact name depends on your router brand.
In this area, find the option related to scheduling or time control. It might be called “Time Restrictions,” “Access Schedule,” or similar.
Creating a New Schedule
Most routers allow you to set multiple schedules for different days and times. To create a new one, select “Add New” or “Create Schedule.”
Specify the days of the week and the start and end times when you want the internet access to be active or blocked. For example, you might set weekdays from 8 AM to 9 PM to allow internet, and block after that.
Assigning Devices to the Schedule
After creating schedules, assign them to specific devices or user profiles. This can usually be done by selecting the device name or MAC address from a list.
By assigning schedules, you control exactly when each device can or cannot connect to the internet, giving you customized management options.
Adjusting and Testing the Schedule
Review your schedule to ensure it matches your needs. Save the settings and then test by trying to connect a device during restricted hours.
If the device is blocked or allowed as intended, your schedule works correctly. If not, revisit the settings and make necessary adjustments.
Additional Tips for Effective Scheduling
- Keep schedules simple: Avoid overcomplicating with too many rules.
- Use descriptive names: Name schedules and devices for easy reference later.
- Update regularly: Adjust schedules as household needs change or new devices are added.
- Combine with other features: Use parental controls or Wi-Fi timers for added security.
Common Troubleshooting Tips
- If schedules don’t work, verify your router’s firmware is up to date. Firmware updates fix bugs and improve functionality.
- Double-check that the schedule times are set correctly with the proper AM/PM or 24-hour format.
- Ensure devices are properly assigned to the schedule. Sometimes, a device may not be recognized correctly.
- If access issues persist, restart the router to apply changes effectively.
Choosing the Right Router for Time Scheduling
If your current router lacks this feature, consider upgrading to a model with advanced scheduling options. Look for routers with user-friendly interfaces and robust scheduling capabilities.
Popular brands like TP-Link, ASUS, Netgear, and Linksys generally offer routers with customizable access schedules, suitable for home or small business use.
Related Topics to Enhance Your Network Control
- Setting up parental controls: Combine scheduling with content filtering to protect children.
- Creating guest networks: Limit guest access hours for better security.
- Optimizing Wi-Fi placement: Proper placement reduces interference and improves schedule effectiveness.
Benefits of Regularly Reviewing Your Settings
Periodically reviewing your schedule ensures it still meets your household’s needs. Adjust times if your schedule changes or if you notice connectivity issues.
This practice keeps your network secure and operating smoothly, giving you better control over internet usage.
By following these steps and tips, setting up a router time schedule becomes a straightforward process that enhances your overall network management. It helps balance internet access with household rules and security, making your digital environment safer and more organized.
How to Set Time in Wi-Fi Router | TP-Link Wi-Fi Router | Time Settings
Frequently Asked Questions
How can I set up a weekly schedule for my router’s internet access?
To create a weekly schedule, log into your router’s admin panel and navigate to the Time or Schedule section. Select the option to add a new schedule, then specify the days of the week and the times when you want to enable or disable internet access. Save your settings to activate the schedule. This allows you to restrict or allow internet usage during specific times each week.
What steps should I take to configure daily time restrictions on my router?
First, access your router’s configuration interface through a web browser. Locate the scheduling or access control menu, then choose the option for daily time restrictions. Set the start and end times for when internet access should be available each day. Apply and save your changes. This method helps enforce daily limits on internet usage effectively.
Can I assign different schedules for various devices connected to my router?
Yes, many routers offer device-specific scheduling features. Inside the admin panel, go to the device management or attached devices section. Select a device and assign a custom schedule for its internet access. This feature gives you control over individual device usage, allowing you to block or grant access at specific times.
How do I modify or update an existing time schedule on my router?
To update a schedule, log into your router’s interface and find the current schedule settings. Choose the schedule you want to modify, then adjust the days and times accordingly. Save your changes to ensure the new schedule takes effect. Regular updates help keep your internet access aligned with your routines.
Are there any precautions to take when setting up a router time schedule?
Make sure the router’s date and time are correctly set, as inaccurate time settings can affect scheduled restrictions. Also, verify that the schedule rules are correctly configured for the desired days and times. Finally, test the schedule to confirm it works as intended and doesn’t unintentionally block essential services or devices.
Final Thoughts
In summary, setting up a router time schedule helps control internet access efficiently. To do this, access your router’s admin panel and locate the scheduling or parental controls section. Configure the desired time slots for internet availability, and save your settings. Knowing how to setup router time schedule allows you to enhance network management and ensure better control over usage.

I specialize in process engineering and system optimization. I enjoy writing guides that simplify troubleshooting and help improve efficiency in everyday tech use.