Quick Answer: To use a laptop’s webcam and microphone, follow these simple steps:
1. Open the camera app on your laptop or access it through video-calling applications like Zoom or Skype.
2. Check if your webcam and microphone are properly connected and working.
3. Adjust the settings for your webcam and microphone, such as resolution, lighting, and audio input, according to your preferences.
4. Make sure to grant necessary permissions for the camera and microphone to access applications.
5. Test your webcam and microphone by recording a video or making a call to ensure they are functioning correctly.
Introduction:
In today’s digital age, laptops have become an essential tool for communication, work, and entertainment. Whether you want to participate in video conferences, make video calls to loved ones, or even create YouTube videos, knowing how to use your laptop’s webcam and microphone is crucial. However, many people find this aspect of technology daunting. Don’t worry! In this article, we will guide you step by step on how to use your laptops webcam and microphone effectively. Whether you are a beginner or just looking to refresh your skills, we’ve got you covered. So, let’s dive in and unlock the potential of your laptop’s built-in camera and microphone!

How to Use a Laptop’s Webcam and Mic
Using a laptop’s webcam and microphone can greatly enhance your online communication experience, whether you’re participating in video conferences, attending virtual classes, or simply connecting with friends and family. In this guide, we will walk you through the steps to effectively use your laptop’s webcam and microphone for various purposes.
Using the Webcam
1. Checking Webcam Functionality
Before diving into using your laptop’s webcam, it’s important to ensure that it is working properly. Follow these steps to check its functionality:
- Go to your laptop’s Start menu and type “Camera”. Select the “Camera” app when it appears.
- If the camera starts and you can see yourself on the screen, it means your webcam is functioning correctly. If not, proceed to the next step.
- Check if the webcam is enabled in your laptop’s settings. Go to the Settings menu, locate the “Privacy” section, and ensure that the camera permission is enabled for the applications you want to use.
- If the camera still doesn’t work, update your webcam driver. Visit the manufacturer’s website, find the latest driver for your webcam model, download, and install it.
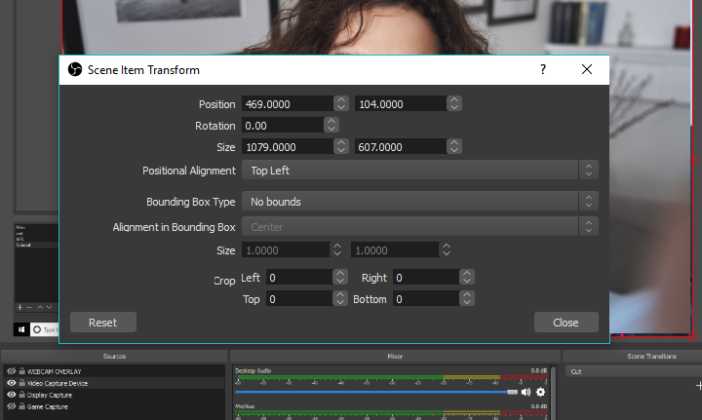
2. Adjusting Webcam Settings
To ensure the best video quality and optimize your webcam experience, you may need to adjust a few settings. Here’s how:
- Open the Camera app or the application you plan to use the webcam with.
- Look for the settings icon, often represented by a gear or a similar symbol, and click on it.
- Explore the available settings, which may include options to adjust brightness, contrast, saturation, and resolution.
- Experiment with different settings until you find the ideal configuration for your needs.
3. Using the Webcam for Video Calls
Now that your webcam is ready, let’s explore how to use it for video calls using popular applications such as Zoom, Skype, or Google Meet:
- Launch the video conferencing application of your choice on your laptop.
- Log in to your account or create a new one if required.
- Find the “Settings” or “Preferences” section within the application and locate the “Video” settings.
- Select your laptop’s webcam from the available options.
- Test the webcam by making a call to a friend or using the application’s test call feature.
- If the video appears as expected, you are ready to participate in video calls using your laptop’s webcam!
Using the Microphone
1. Checking Microphone Functionality
Just like with the webcam, it’s essential to ensure that your laptop’s microphone is functioning correctly before utilizing it. Follow these steps to check its functionality:
- Go to your laptop’s Start menu, type “Sound” and select the “Sound settings” option.
- In the Sound settings window, locate the “Input” section and check if your laptop’s built-in microphone is selected as the default device.
- Speak into the microphone and observe the input level indicator. If it moves as you speak, your microphone is working correctly. Otherwise, proceed to the next step.
- Ensure the microphone is not muted. In the Sound settings window, click on “Device properties” and make sure the volume is turned up and the mute option is disabled.
- If the microphone still doesn’t work, update the audio driver. Visit the manufacturer’s website, find the latest driver for your laptop’s audio chipset, download, and install it.
2. Adjusting Microphone Settings
To achieve the best sound quality and avoid audio issues, you might need to adjust your laptop’s microphone settings. Here’s how:
- Access the Sound settings window as explained in the previous section.
- Click on the “Sound Control Panel” link on the right side of the window.
- In the new window that opens, select the “Recording” tab.
- Locate your laptop’s built-in microphone, right-click on it, and select “Properties”.
- In the microphone properties window, navigate to the “Levels” tab.
- Adjust the microphone volume and boost levels if necessary.
- Click “OK” to save the changes.
3. Using the Microphone for Audio Recording
Once your microphone is set up correctly, you can use it to record audio on your laptop. Here’s how to do it using the built-in voice recorder application available on most Windows laptops:
- Open the Start menu and search for “Voice Recorder”. Select the app when it appears.
- Click on the microphone icon to start recording.
- Speak into the microphone to capture your voice or any audio you want to record.
- Click on the stop button to finish the recording.
- Save the recorded audio file to your desired location.
4. Using the Microphone for Online Communication
To utilize your laptop’s microphone during online voice or video calls, follow these general steps for popular communication applications like Skype or Discord:
- Launch the communication application of your choice on your laptop.
- Sign in or create a new account if necessary.
- Navigate to the settings/preferences section of the application and locate the audio settings.
- Select your laptop’s built-in microphone as the default audio input device.
- Test the microphone by making a call or using the application’s test call feature.
- Ensure that the input level indicator moves as you speak, indicating that the microphone is capturing your voice.
Now that you know how to use your laptop’s webcam and microphone effectively, you can fully harness their capabilities for various activities, whether it’s participating in video conferences, recording audio, or staying connected with loved ones. Enjoy the seamless online communication experience on your laptop!
How to TURN OFF LAPTOP MIC or WEBCAM MIC Windows 10 (Fast Method)
Frequently Asked Questions
How do I access and use the webcam on my laptop?
To access and use the webcam on your laptop, follow these steps:
- Locate the camera app or software on your laptop. This is usually pre-installed or can be downloaded from the manufacturer’s website.
- Open the camera app/software.
- Allow any necessary permissions for the app to access your camera.
- You should now see the live video feed from your webcam. Adjust any settings like resolution, brightness, or filters if needed.
- If you want to take a photo, click on the camera button. If you want to record a video, click on the video button. Some apps may have additional features like video effects or timers.
- Once you are done using the webcam, simply close the camera app/software.
How can I test if my laptop’s microphone is working?
To test if your laptop’s microphone is functioning properly, follow these steps:
- Open the sound settings on your laptop. This can usually be done by right-clicking on the speaker icon in the taskbar and selecting “Sounds” or “Recording devices.”
- In the recording devices tab, look for your laptop’s microphone. It may be listed as “Microphone” or have the manufacturer’s name.
- Make sure the microphone is enabled and set as the default device.
- Speak into the microphone and check if the level meter beside it moves. If it does, your microphone is working. If not, try adjusting the microphone’s volume or check if it’s muted.
- If the microphone is still not working, you may need to update the audio driver or troubleshoot further using the manufacturer’s support resources.
Can I use my laptop’s webcam and microphone for video conferencing?
Absolutely! Most laptops come with built-in webcams and microphones that can be used for video conferencing. Here’s how to set it up:
- Choose a video conferencing software or platform, such as Zoom, Skype, or Microsoft Teams.
- Download and install the selected video conferencing app if you don’t have it already.
- Open the app and sign in/create an account.
- Access the settings or preferences menu within the app and look for the audio/video settings.
- Select your laptop’s webcam and microphone as the default devices for video and audio.
- You are now ready to join or initiate video conferences using your laptop’s webcam and microphone.
Final Thoughts
In conclusion, using a laptop’s webcam and mic is a simple and efficient way to communicate with others through video calls or record videos. To start, check that your laptop has built-in webcam and mic functionality. Adjust the settings to ensure optimum quality and adjust the position of the laptop for the best angle. Test the webcam and mic before every use, and consider using external peripherals for enhanced audio and video experience as necessary. With these steps, you can easily utilize and make the most of your laptop’s webcam and mic for smooth communication and video recording.

I follow the latest trends in smart devices, portable monitors, and gaming accessories. My goal is to provide real-world insights that help readers make smarter tech decisions.