To connect a dual monitor setup to your MacBook Air, you’ll need the right accessories and a few simple steps. Use a compatible adapter or dock to connect two external displays, then adjust your display settings in macOS to extend or mirror your screens seamlessly. With the right setup, you can boost your productivity and multitask effortlessly.
Connecting dual monitors to your MacBook Air may sound tricky, but it’s actually straightforward with a few key tools. Whether you want more screen space for work or a better gaming experience, understanding how to set up dual displays can make a huge difference. The process involves selecting the right adapters, connecting your monitors, and configuring display preferences within macOS. Once set up, you’ll enjoy a more immersive, organized workspace that keeps everything within easy reach. Keep reading to learn step-by-step how to turn your MacBook Air into a multi-monitor powerhouse and enjoy the benefits of expanded screens.

How to Use Dual Monitor with MacBook Air
Understanding the Benefits of a Dual Monitor Setup
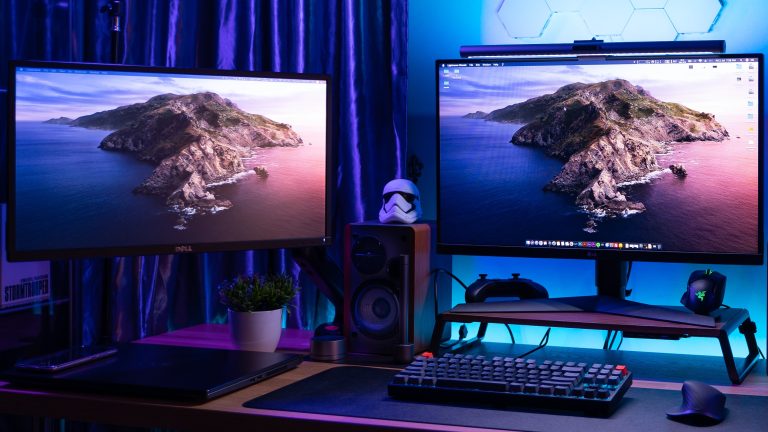
Using two monitors with your MacBook Air can boost productivity and make multitasking easier. It allows you to have multiple applications open at once without constantly switching between windows. This setup is especially helpful for students, professionals, or anyone who works with large files.
Checking Compatibility and Requirements
Before setting up dual monitors, ensure your MacBook Air supports it. Recent models with M1 or M2 chips typically support one external display. Check your MacBook Air’s specifications to confirm this. Also, verify that your monitors have compatible input ports like HDMI, DisplayPort, or USB-C.
Gathering Necessary Equipment
To connect dual monitors, you’ll need:
- Two monitors with compatible inputs
- Appropriate cables (USB-C to HDMI, Thunderbolt, etc.)
- Adapters if your monitors or MacBook Air ports don’t match
- A docking station or multi-port hub for easier connections (optional but recommended)
Using a docking station can simplify connections and reduce clutter.
Choosing the Right Cables and Adapters
Select cables that match both your MacBook Air’s output ports and your monitors’ input ports. For MacBook Air models with Thunderbolt/USB-C ports, USB-C to HDMI or DisplayPort cables work well. When using adapters, ensure they support 4K or high resolution if needed.
Connecting Your Monitors to MacBook Air
Start by connecting the first monitor using the appropriate cable and adapter. Then, connect the second monitor. For models supporting two external displays, connect both directly; for others, consider a multi-port hub or docking station. After connecting, power on all devices.
Configuring Display Settings on macOS
Once connected, go to System Preferences and select Displays. You’ll see options to arrange your monitors visually, set resolutions, and choose primary displays. Drag the display icons to match their physical placement for seamless cursor movement.
Arranging Monitors for Optimal Workflow
Arrange your monitors in the setup view to match their physical orientation. For example, if one monitor is on the right, position it on the right in settings. This allows your mouse to move smoothly between screens.
Adjusting Resolution and Display Options
Ensure each monitor is set to its native resolution for best clarity. You can also choose scaled resolutions to improve performance on lower-end monitors. Enable or disable features like ‘Mirror Displays’ based on your preference.
Managing Multiple Displays Effectively
Using multiple screens requires good management. Use the menu bar and Dock on your primary display, and assign specific apps to each screen for better workflow. You can also customize desktop backgrounds for each monitor.
Using Mission Control for Better Navigation
Mission Control helps you see all open windows across multiple screens. Activate it via a hot corner or keyboard shortcut to quickly switch between tasks. This can help manage many windows efficiently.
Creating Virtual Desktops and Spaces
macOS allows creating separate Spaces or virtual desktops on each monitor. Use this feature to organize work into different projects or categories. It keeps your workspace tidy and focused.
Optimizing Performance and Troubleshooting
Sometimes, external displays may not work as expected. If you encounter issues, check cable connections, update macOS, and verify that your MacBook Air supports multiple displays. Restart your device if needed.
Common Issues and Fixes
– No signal on connected monitors: check cables and connections
– Resolution problems: adjust display settings in System Preferences
– Display flickering or lag: update graphics drivers or disconnect other peripherals
Enhancing Your Dual Monitor Experience
For the best experience, keep your macOS updated, and consider calibrating color settings for accurate display. Organize your workspace to minimize clutter and maximize efficiency with proper monitor placement.
Additional Tips for Using Dual Monitors
– Use keyboard shortcuts to move windows between screens
– Enable ‘Hot Corners’ for quick access to Mission Control
– Connect a wireless keyboard and mouse for more flexibility
– Adjust monitor height and angle for ergonomic comfort
Integrating External Peripherals
External peripherals like keyboards and mice can improve your workflow when using dual monitors. Wireless options provide freedom of movement, while wired devices ensure stability. Make sure all peripherals are compatible with your MacBook Air.
Maintaining Your Dual Monitor Setup
Keep your monitors clean and dust-free to maintain display quality. Regularly check cables and connections for wear and tear. Update your macOS regularly to ensure compatibility and access to new features.
Exploring Related Topics
Besides connecting dual monitors, consider exploring:
- Docking stations for MacBook Air
- Wireless display options
- Using external GPUs for enhanced graphics
- Best monitor configurations for productivity
These can further improve your overall experience and expand your capabilities.
This guide offers a comprehensive overview of how to connect and manage dual monitors with your MacBook Air. Follow these steps carefully to set up a productive and clutter-free workspace. Proper configuration and equipment selection will make multitasking more efficient and enjoyable.
How To Setup Dual Monitors On Mac – Full Guide
Frequently Asked Questions
What types of adapters are compatible with a MacBook Air for dual monitor setup?
To connect multiple monitors to a MacBook Air, you may need USB-C to HDMI or DisplayPort adapters, depending on your monitors’ ports. Ensure that the adapters support the resolution and refresh rate of your displays for optimal performance. Check the specifications of your MacBook Air to confirm compatibility and avoid issues with connectivity or display quality.
How can I configure display settings to extend my desktop across two monitors?
After connecting your monitors, go to System Preferences and select Displays. Click on the Arrangement tab, then drag the monitor icons to match your physical setup. To extend your workspace, uncheck the ‘Mirror Displays’ option. You can also adjust the resolution and positioning to ensure a seamless transition between screens, making multitasking more efficient.
Is it possible to connect more than two external monitors to a MacBook Air?
Connecting more than two external monitors to a MacBook Air depends on your specific model and the available ports. Most models support only one or two external displays without additional hardware. For multiple monitors beyond this, consider using DisplayLink adapters or docking stations that expand your connection options. Always verify your laptop’s specifications to ensure it can handle the number of monitors you plan to connect.
What should I do if my external monitor isn’t recognized by my MacBook Air?
First, check all cable connections and ensure adapters are properly plugged in. Restart your MacBook Air and reconnect the monitor. Open System Preferences > Displays and click the ‘Detect Displays’ button if available. If the monitor still isn’t recognized, try testing with a different cable or adapter. Updating your macOS to the latest version can also resolve compatibility issues.
Can I use a wireless connection to extend my MacBook Air display to another monitor?
Yes, you can use wireless solutions like AirPlay to mirror or extend your MacBook Air’s display to compatible Apple TV or smart displays. Enable AirPlay from the menu bar, select your device, and choose whether to mirror or extend your desktop. Keep in mind that wireless connections may introduce slight latency, so they work best for less demanding tasks or presentations.
Final Thoughts
Using dual monitors with your MacBook Air enhances productivity and multitasking. First, identify the ports on your MacBook Air and connect the monitors using compatible adapters or cables. Adjust display settings in System Preferences to arrange screens and set preferences.
With the correct setup, you can easily extend your workspace and improve workflow efficiency. Understanding how to use dual monitor with MacBook Air ensures you get the most out of your device in everyday tasks and work projects.
I’m passionate about hardware, especially laptops, monitors, and home office gear. I share reviews and practical advice to help readers choose the right devices and get the best performance.