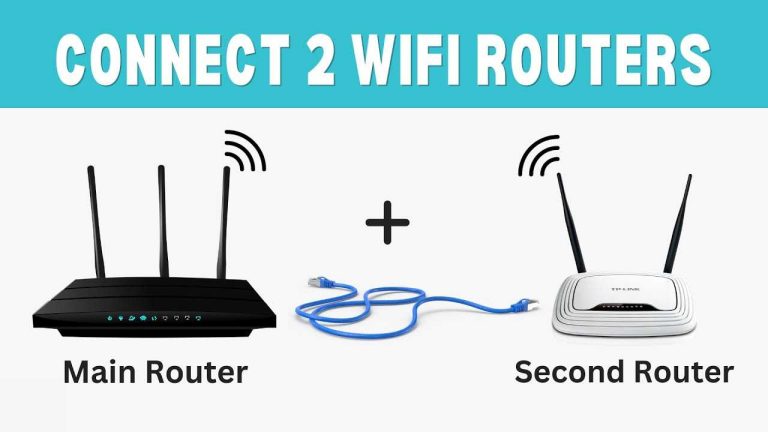
To connect a personal router to apartment Wi-Fi, you need to configure it as a wireless access point or a range extender. This involves connecting your personal router to the apartment’s Wi-Fi network, either wirelessly or through an Ethernet cable, and adjusting the router’s settings through its web interface.
Connecting a personal router to an apartment WiFi is a common and practical way of expanding the range of internet connectivity. You may have experienced dead zones or slow internet speed in certain areas of your apartment, which can be frustrating when you need to work or stream your favorite shows.
Fortunately, there are five easy methods to connect your personal router to the apartment WiFi and enhance your internet experience. In this article, we will guide you through each method step by step, so you can choose the one that fits your needs and technical abilities best. Let’s get started!
Method 1: Check with Your Apartment Management
Before connecting your personal router to your apartment’s Wi-Fi network, it is important to check with your apartment management first. This is because some apartments may have strict policies against connecting personal routers to their network.
1.1 Ask for Permission
Before you connect your personal router to your apartment’s Wi-Fi network, it is important to check with your apartment management for permission. Some apartments may have strict policies against connecting personal routers to their network, so it is crucial to follow their rules and regulations.
To get started, reach out to your apartment management and inquire about their policy regarding personal routers. Ask if they allow residents to connect their own routers and if there are any specific procedures or guidelines that need to be followed.
It is important to note that some apartments may require you to register your router with them before connecting it to their network. This allows them to monitor the network traffic and ensure that all devices connected are authorized.
If your apartment management does allow personal routers, make sure you understand their policies and guidelines before proceeding with the connection process. This will prevent any potential issues or conflicts in the future.
In summary, before connecting a personal router to an apartment Wi-Fi network, it is important to ask for permission from the apartment management and understand any policies or guidelines they have in place. This ensures a smooth and trouble-free connection process.
1.2 Inquire About the Procedure
Before connecting your personal router to your apartment’s WiFi network, it is important to inquire about the procedure. This will help you understand the steps you need to take and avoid any potential issues that may arise.
Firstly, you should check with your apartment management whether they allow residents to connect their personal routers to their network. Some apartments may have strict policies against it due to security concerns or bandwidth limitations. It is important to follow these rules and regulations to avoid any penalties or legal issues.
Assuming that your apartment allows personal routers, the next step is to inquire about the specific procedure for connecting them. The management may have a designated process that needs to be followed in order for you to connect your router successfully.
For instance, they may require you to provide them with the MAC address of your router before allowing it on their network. Alternatively, they may require you to sign an agreement acknowledging that you are responsible for any security breaches or illegal activities that occur through your connection.
It is also important to inquire about any fees associated with connecting a personal router. Some apartments may charge a monthly fee for this service, while others may offer it free of charge.
By inquiring about the procedure beforehand, you can ensure that you are following all necessary steps and avoiding any potential issues with your apartment’s management or IT department. This will make the process of connecting your personal router much smoother and hassle-free.
Method 2: Get a Personal Router
Getting a personal router is one of the easiest ways to connect to your apartment’s WiFi network. With a personal router, you can enjoy faster internet speeds and better connectivity without having to worry about sharing the network with other residents.
2.1 Choose the Right Router Type
When it comes to connecting your personal router to your apartment WiFi, it is important to choose the right router type. There are a few things to keep in mind when selecting a router that will work best for your needs.
Firstly, you need to consider the speed of your internet connection. If you have a slow internet connection, then a basic router will suffice. However, if you have high-speed internet, then you’ll need a more advanced router that can handle the higher speeds.
Secondly, you’ll want to consider the size of your apartment and how many devices will be connected to the router. If you live in a small apartment with only a few devices, then a basic router should work just fine. However, if you have multiple devices and live in a larger space, then you may want to consider getting a more powerful router with better range.
Lastly, consider any additional features that may be important for your needs. For example, if you plan on using your personal router for gaming or streaming video content, then you may want to look for routers with Quality of Service (QoS) features that prioritize bandwidth for these types of activities.
Overall, choosing the right router type is crucial when connecting your personal router to your apartment WiFi. Take into consideration the speed of your internet connection, the size of your apartment and number of devices that will be connected, as well as any additional features that may be important for your specific needs. By doing so, you’ll ensure that you have an optimal experience using your personal router on your apartment’s network.
2.2 Configure the Router Settings
Configuring the router settings is an essential step in connecting your personal router to your apartment’s WiFi network. Once you have chosen the right router type, it is time to set it up by configuring its settings.
Firstly, connect your router to your computer or laptop using an Ethernet cable. Then, open a web browser and enter the default IP address of your router into the address bar. This IP address can usually be found on the bottom or back of your router or in its user manual.
Once you have accessed your router’s configuration page, you will need to enter a username and password. The default login credentials are often printed on the bottom or back of your router as well. It is highly recommended that you change these login details for security purposes.
After logging in, you should see various options for configuring your router’s settings. These may include setting up a new network name (SSID) and password, enabling wireless security protocols such as WPA2-PSK encryption, and adjusting other advanced settings such as port forwarding and Quality of Service (QoS).
It is important to note that some apartment complexes may require specific settings to be configured on personal routers before they can be connected to their network. Therefore, it may be necessary to consult with your apartment management or IT department for guidance on which settings need to be adjusted.
Once you have configured all necessary settings on your personal router, save any changes made and disconnect it from your computer/laptop. Then, connect it to a power source and wait for it to fully boot up.
Finally, try connecting any devices (such as laptops or smartphones) to the newly created network using the SSID and password you set up earlier. If successful, congratulations! You have successfully connected your personal router to your apartment’s WiFi network.
In conclusion, configuring the settings of a personal router is a crucial step in connecting it to an apartment’s WiFi network. By following these steps, you can ensure that your router is set up correctly and securely.
Method 3: Connect via Ethernet Cable
Connecting your personal router to the apartment’s Wi-Fi network can be a great way to enhance your internet experience. One of the most reliable ways to connect is by using an Ethernet cable. In this method, you will need to check for available Ethernet ports in your apartment and connect the cable accordingly.
Check for Available Ports
Before connecting your personal router via an Ethernet cable, make sure that there are available ports in your apartment. You can find these ports on the wall or floor, usually near electrical outlets. These ports are commonly labeled with “Ethernet” or “LAN.”
If you’re unsure whether there are available ports in your apartment or not, you can contact your apartment management and ask them about it. They may also provide you with a map of where these ports are located.
Connect the Ethernet Cable
Once you have found an available port, it’s time to connect the Ethernet cable from your personal router to the port. To do this, follow these steps:
- Turn off both your modem and personal router.
- Connect one end of the Ethernet cable to an available port on the modem.
- Connect the other end of the Ethernet cable to the WAN or Internet port on your personal router.
- Turn on both devices.
After following these steps, wait for a few minutes until both devices have completely booted up and established a connection.
Using an Ethernet cable provides a more stable and faster internet connection compared to using Wi-Fi alone. It’s especially useful when streaming videos or playing online games that require fast and uninterrupted internet speed.
However, keep in mind that some apartments may not allow residents to use their own routers or modify their existing network setup without permission. Make sure to check with your apartment management before proceeding with any of these methods.
In conclusion, connecting via an Ethernet cable is one of the easiest and most reliable ways to connect your personal router to an apartment Wi-Fi network. Just make sure to check for available ports, connect the cable properly, and follow any rules or regulations set by your apartment management.
3.1 Check for Available Ports
When trying to connect your personal router to the apartment WiFi, you need to check if there are available Ethernet ports in your apartment. An Ethernet port is a socket on your wall that can be used to connect devices directly to the internet using an Ethernet cable.
To check for available ports, start by looking around your apartment for any sockets labeled “Ethernet” or “LAN.” These will typically be located near the floor and may have a cover over them. If you cannot find any Ethernet ports, then it may be necessary to contact your apartment management to inquire about their availability.
It is important to note that some apartments may not have Ethernet ports available in each unit. In this case, you may need to consider other methods such as using a powerline adapter or a wireless range extender.
If you do find an available Ethernet port in your apartment, then you can proceed with connecting your personal router via an Ethernet cable. It’s important to ensure that the router is compatible with the type of cable being used (usually Cat5e or Cat6). Once connected, follow the instructions provided by your router manufacturer for setting up and configuring the device.
Overall, checking for available Ethernet ports is an essential first step when attempting to connect your personal router to the apartment WiFi. While it may take some effort and investigation on your part, doing so can provide you with faster and more reliable internet access within your living space.
3.2 Connect the Ethernet Cable
Connecting your personal router to your apartment WiFi can be a great way to enhance your internet experience. One of the easiest and most reliable ways to connect is by using an ethernet cable. Here are the steps you need to follow:
Method 4: Use a Powerline Adapter
A Powerline Adapter is a device that uses your apartment’s electrical wiring to transmit data signals. It is an ideal solution if you want to connect your personal router to the apartment WiFi without running Ethernet cables across the room. Here are two simple steps for using a Powerline Adapter:
4.1 Purchase a Powerline Adapter Kit
A powerline adapter kit is a great option for connecting your personal router to your apartment WiFi network. It allows you to use the electrical wiring in your apartment to create a wired network connection without having to run any cables.
To get started, you’ll need to purchase a powerline adapter kit. These kits typically come with two adapters: one that you plug into an electrical outlet near your router and another that you plug into an outlet near the device you want to connect (in this case, your personal router).
When shopping for a powerline adapter kit, make sure to choose one that is compatible with your apartment’s electrical system and supports the speed of your internet connection. Look for models that offer features such as multiple Ethernet ports, WiFi connectivity, and easy setup.
Once you have your powerline adapter kit, it’s time to configure it. Here are the steps:
- Plug one of the adapters into an electrical outlet near your router and connect it to the router using an Ethernet cable.
- Plug the second adapter into an electrical outlet near where you plan to set up your personal router.
- Connect the second adapter to your personal router using another Ethernet cable.
- Power on both adapters.
That’s it! Your personal router should now be connected to the internet via the powerline adapter kit.
It’s important to note that while powerline adapters can be a convenient solution for connecting devices in different rooms of your apartment, they may not work as well in older buildings with outdated wiring or if there are many other electronic devices plugged in throughout the apartment. In these cases, other methods such as using an Ethernet cable or wireless range extender may be more effective.
In conclusion, purchasing a powerline adapter kit is an effective way of connecting a personal router to an apartment WiFi network without running cables through walls or ceilings. Make sure to choose a compatible model and follow the instructions carefully for optimal results.
4.2 Configure the Powerline Adapter
To use a Powerline Adapter, you need to purchase a Powerline Adapter kit, which usually comes with two adapters. One adapter connects to the router using an Ethernet cable, and the other adapter is plugged into an electrical outlet in the room where you want to connect your device.
After purchasing the kit, follow these steps to configure the Powerline Adapter:
- Connect one of the adapters from the kit to your router using an Ethernet cable.
- Plug this adapter into a power outlet near your router.
- Connect the second adapter from the kit to your device using another Ethernet cable.
- Plug this adapter into a power outlet in the room where you want to connect your device.
Once both adapters are connected and powered on, they should automatically establish a connection through your apartment’s electrical wiring.
It is important to note that Powerline Adapters work best when plugged directly into a wall outlet and not into surge protectors or extension cords. Additionally, some older electrical wiring may not be compatible with Powerline Adapters, so it’s always best to check with your apartment management before making any purchases.
Configuring a Powerline Adapter is relatively simple and usually requires no additional setup beyond plugging them in. However, some kits may come with software that allows you to manage and monitor your network connection.
Overall, using a Powerline Adapter can be an effective way to connect personal devices to apartment Wi-Fi without having to run long Ethernet cables or invest in expensive wireless range extenders.
Method 5: Use Wireless Range Extender
A wireless range extender is an excellent option for extending the coverage of your apartment Wi-Fi network. It is a device that amplifies the existing Wi-Fi signal and extends it to cover a larger area. If you have a large apartment or if your router is located far away from your room, using a wireless range extender can be very helpful.
5.1 Purchase a Wireless Range Extender
A Wireless Range Extender is a device that helps to extend the range of your Wi-Fi signal. It works by receiving the existing wireless signal and then amplifying it, thus increasing the coverage area. If you have a weak Wi-Fi signal in your apartment or are unable to connect to it from certain areas, using a wireless range extender can help you improve your connectivity.
To use a wireless range extender, you first need to purchase one that is compatible with your router and meets your specific needs. There are several options available on the market, so make sure to choose one that fits your budget and requirements.
Once you have purchased a wireless range extender, follow these steps to set it up:
- Place the Range Extender: Find an optimal location for placing the range extender. Ideally, it should be placed halfway between your router and the area where you want to improve connectivity. Make sure there are no obstructions like walls or furniture blocking its path.
- Connect the Range Extender: Plug in the range extender into an electrical outlet near your router.
- Connect Your Device: Use a laptop or smartphone to connect to the range extender’s network using its default login credentials (usually printed on the back of the device). Once connected, open a web browser and type in the IP address of your router (also printed on its label) to access its settings page.
- Configure Settings: On the router’s settings page, look for an option called “Wireless Repeating Function” or “Range Extending.” Enable this option and select the name of your home network from the list of available networks.
- Save Settings: After selecting your home network, save all changes made on this page before exiting.
- Test Connectivity: Once you’ve completed all steps above, test whether connectivity has improved by connecting multiple devices from different areas in your apartment and checking their internet speed.
Using a wireless range extender can be an effective way to extend the range of your Wi-Fi signal and improve connectivity in areas with weak signals. However, before purchasing and setting up a range extender, make sure to check with your apartment management about their policies on personal routers and network extenders. By following the correct procedures, you can enjoy better connectivity without violating any rules or regulations.
5.2 Set up the Wireless Range Extender
To set up a wireless range extender, follow these simple steps:
- First, choose the right wireless range extender for your needs. Consider factors such as the size of your apartment and the distance between your personal router and the areas where you need better Wi-Fi coverage.
- Once you have purchased your wireless range extender, plug it into an electrical outlet in an area where you want to improve Wi-Fi coverage.
- Connect your computer or mobile device to the wireless network that is being broadcasted by the range extender.
- Open a web browser on your device and enter the IP address of your range extender into the address bar. This will typically be listed in the user manual that came with your device.
- Follow the instructions provided by the manufacturer to configure your wireless range extender settings. This may involve selecting which Wi-Fi network you want to extend, entering login credentials for that network, and choosing a name and password for your new extended network.
- Once you have completed these steps, test out your new extended network by moving around different areas of your apartment and checking for improved Wi-Fi signal strength.
It’s important to note that while using a wireless range extender can be an effective way to improve Wi-Fi coverage in certain areas of your apartment, it may not always provide optimal performance compared to using a personal router or other methods such as connecting via Ethernet cable or using a powerline adapter. Be sure to consider all available options before making a decision on how best to connect your personal router to apartment Wi-Fi.
Note: Make sure to follow apartment rules and regulations before connecting your personal router to their network, as some may have strict policies against it.
Before attempting to connect your personal router to your apartment’s Wi-Fi network, it is important to check and follow the rules and regulations set by your apartment management. Some apartments may have strict policies against connecting personal routers to their network due to security concerns or bandwidth limitations.
It is advisable to contact your apartment management first and ask for permission before proceeding with any of the methods mentioned in this article. This way, you can avoid any potential conflicts or penalties that may arise from violating the apartment’s policies.
If your apartment management allows personal routers, you can proceed with any of the five methods mentioned in this article. However, it is still recommended to exercise caution and follow proper procedures when connecting your router.
By following the rules and regulations set by your apartment management, you can ensure a safe and hassle-free experience when connecting your personal router to their Wi-Fi network.
Conclusion
In conclusion, connecting a personal router to an apartment Wi-Fi network can be a convenient solution for those who want to enjoy a faster and more reliable internet connection. However, it is crucial to follow the proper procedures and guidelines before doing so. Always check with your apartment management about their policies and obtain permission if required.
Choosing the right type of router, configuring the settings properly, using an Ethernet cable or powerline adapter kit, or setting up a wireless range extender are all effective methods for establishing a connection. By taking these steps, you can ensure that you are able to enjoy a seamless online experience without violating any rules or regulations set by your apartment complex. So go ahead and connect your personal router to your apartment Wi-Fi, but make sure that you do it in the right way!

With experience in IT support and consumer technology, I focus on step-by-step tutorials and troubleshooting tips. I enjoy making complex tech problems easy to solve.


