


Worried about webcam privacy? This guide shows you how to disable your webcam temporarily using several easy methods. Whether it’s a simple physical cover, adjusting operating system settings on Windows or macOS, or revoking browser permissions, you’ll find clear, step-by-step instructions to secure your privacy and prevent unauthorized access. Keep your camera off until you need it again, giving you complete control over your digital visibility.
How to Disable Webcam Temporarily
Are you concerned about your privacy? Do you worry about accidental webcam activations during sensitive moments? You’re not alone. In today’s digital world, knowing how to disable your webcam temporarily is a crucial skill for anyone who values their personal space and digital security. Whether you’re taking a break from video calls, handling confidential documents, or simply want peace of mind, this guide will walk you through various simple and effective methods to turn off your camera until you’re ready to use it again.
This comprehensive guide will show you how to disable your webcam temporarily using physical covers, operating system settings for Windows and macOS, and browser-specific permissions. We’ll provide clear, step-by-step instructions, practical tips, and a troubleshooting section to help you confidently take control of your webcam. Let’s get started on securing your visual privacy!
Key Takeaways
- Physical covers offer instant security: The simplest and most foolproof method to disable your webcam temporarily is by physically covering it with a dedicated slide or a piece of opaque tape.
- Windows users have two main options: You can disable your webcam temporarily through the Device Manager for a system-wide hardware disable, or manage access via Privacy Settings for specific apps.
- macOS provides strong privacy controls: On a Mac, you can easily control which applications have access to your webcam through System Settings, effectively disabling it for most uses without hardware tweaks.
- Manage browser permissions for online safety: For web-based video calls or sites, you can disable your webcam temporarily by revoking camera permissions directly in your browser settings (Chrome, Firefox, Edge).
- Always test after disabling: After implementing any method, always open a camera app or a video conferencing tool to confirm that your webcam is indeed disabled temporarily.
- Remember to re-enable when needed: All methods are designed for temporary disablement; ensure you know how to reverse the steps when you want to use your webcam again for meetings or chats.
- Combine methods for enhanced security: For ultimate peace of mind, consider using a physical cover in conjunction with software-based disabling methods.
Method 1: The Physical Cover – Simple, Secure, and Universal
Sometimes, the simplest solutions are the best. A physical webcam cover is an unbeatable way to disable your webcam temporarily. It offers instant visual confirmation that your camera is blocked, making it impossible for anyone to see through it, regardless of software settings or potential hacks.
Using a Dedicated Webcam Cover
Dedicated webcam covers are small, sliding mechanisms that adhere to your device’s frame, just above the camera lens. They are widely available, inexpensive, and designed to blend seamlessly with your laptop or monitor.
- Step 1: Purchase a Cover. Look for webcam covers that are thin enough not to interfere with your laptop lid closing.
- Step 2: Attach the Cover. Clean the area around your webcam lens. Peel off the adhesive backing from the cover and carefully align it over your webcam, ensuring the sliding mechanism can move freely. Press firmly to secure it.
- Step 3: Slide to Disable. When you want to disable your webcam temporarily, simply slide the cover over the lens. Slide it open when you need to use your camera.
Why it’s great: This method works on any device and provides a physical barrier that cannot be bypassed by software. It’s the ultimate way to disable your webcam temporarily and ensure visual privacy.
DIY Options for Immediate Coverage
If you don’t have a dedicated cover, you can improvise with common household items. These are quick fixes to disable your webcam temporarily in a pinch.
- Opaque Tape: A small piece of electrical tape, painter’s tape, or even a sticky note can work wonders. Avoid clear tape, as light can still pass through.
- Sticky Notes: A folded sticky note placed over the lens works well. Ensure the sticky part holds it firmly in place without leaving residue on the lens itself.
- Small Stickers: Any non-transparent sticker can be used. Just make sure it’s easy to remove without damaging your camera.
When using tape or stickers, always make sure they are placed directly over the lens and are easy to remove without leaving sticky residue. You want to disable your webcam temporarily, not permanently damage it!
Method 2: Through Operating System Settings
For a software-based approach, your operating system provides built-in tools to disable your webcam temporarily. These methods offer more control over which applications can access your camera and can effectively turn it off at a system level.
For Windows Users
Windows offers two primary ways to disable your webcam temporarily: through the Device Manager or via Privacy Settings. Both methods achieve the goal, but offer different levels of control.

Visual guide about How to Disable Webcam Temporarily
Image source: sandbridgehouses.com
Using Device Manager to Disable Your Webcam Temporarily
Disabling your webcam through Device Manager essentially tells Windows to stop recognizing or using the hardware. This is a robust way to disable your webcam temporarily on a system-wide level.
- Step 1: Open Device Manager.
- Press the
Windows key + Xto open the Power User Menu. - Select “Device Manager” from the list.
- Alternatively, search for “Device Manager” in the Windows search bar and click on the result.
- Press the
- Step 2: Locate Your Webcam.
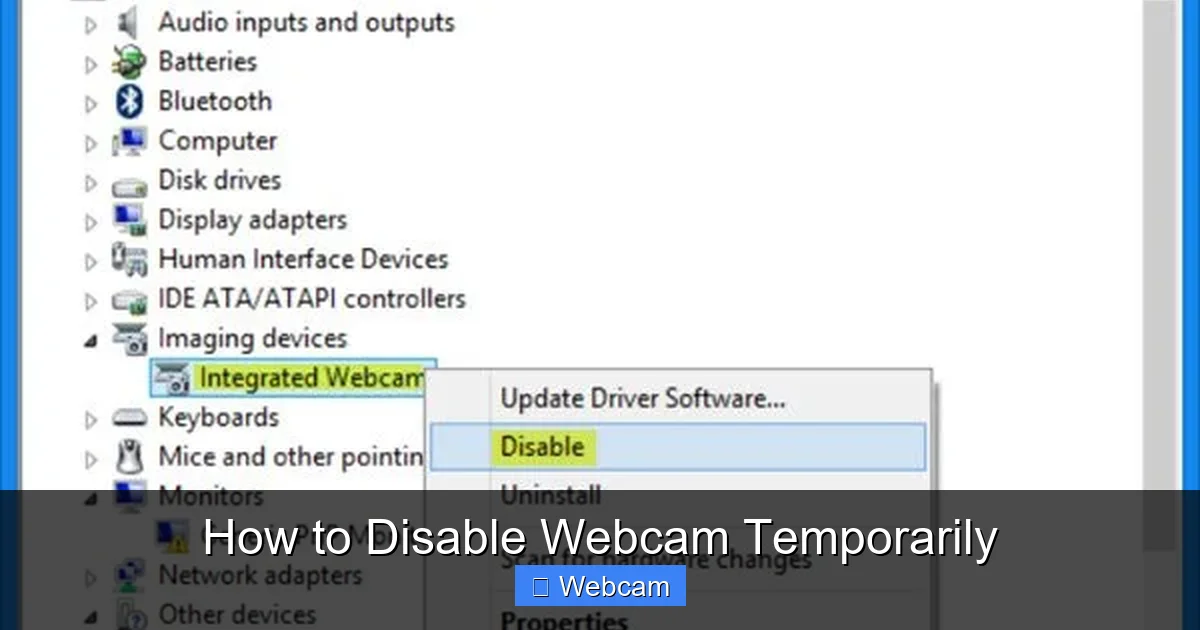
- In the Device Manager window, look for “Cameras,” “Imaging devices,” or “Sound, video and game controllers.” Your webcam will typically be listed under one of these categories.
- Expand the relevant category by clicking the arrow next to it.
- Find your webcam. It might be named “Integrated Webcam,” “USB Camera,” or a specific brand name like “Logitech C920.”
- Step 3: Disable the Device.
- Right-click on your webcam’s name.
- From the context menu, select “Disable device.”
- A warning message might appear, stating that disabling the device will stop it from functioning. Click “Yes” to confirm.
Your webcam is now disabled. To re-enable it, simply return to Device Manager, right-click on the webcam, and select “Enable device.”
Adjusting Privacy Settings to Disable Your Webcam Temporarily
Windows privacy settings allow you to control which applications can access your camera. This is less about turning off the hardware entirely and more about preventing unauthorized software access, helping to disable your webcam temporarily for most apps.
- Step 1: Open Windows Settings.
- Press the
Windows key + Ito open the Settings app. - Alternatively, click on the “Start” button and then the “Settings” gear icon.
- Press the
- Step 2: Navigate to Privacy & Security.
- In the Settings window, click on “Privacy & security” in the left-hand sidebar.
- Step 3: Access Camera Settings.
- Scroll down on the right pane until you find the “App permissions” section.
- Click on “Camera.”
- Step 4: Disable Camera Access.
- At the top of the Camera settings, you’ll see a toggle for “Camera access.” Toggle this switch to “Off.” This will disable your webcam temporarily for all apps that use the Windows permission system.
- You can also scroll down to “Let apps access your camera” and “Let desktop apps access your camera” and turn those toggles off individually or completely. This gives you granular control if you only want to disable your webcam temporarily for specific applications.
To re-enable your webcam, simply return to these settings and toggle “Camera access” back to “On.”
For macOS Users
macOS provides robust privacy controls that allow you to manage which applications can access your webcam. While there isn’t a direct “disable device” option like in Windows Device Manager, controlling app permissions is highly effective in disabling your webcam temporarily for unauthorized use.
Using System Settings (Privacy & Security) to Disable Your Webcam Temporarily
This method prevents most applications from accessing your camera, giving you control over when and how your webcam is used.
- Step 1: Open System Settings.
- Click on the Apple menu in the top-left corner of your screen.
- Select “System Settings” (or “System Preferences” on older macOS versions).
- Step 2: Navigate to Privacy & Security.
- In the System Settings sidebar, click on “Privacy & Security.”
- Step 3: Access Camera Settings.
- Scroll down the right pane until you find “Camera.” Click on it.
- Step 4: Manage App Permissions.
- You will see a list of applications that have requested or currently have access to your camera.
- To disable your webcam temporarily for a specific app, simply toggle off the switch next to its name.
- To effectively disable your webcam temporarily for most uses, ensure that only apps you explicitly trust and need camera access for have their switches turned on. If you turn off access for all listed apps, your webcam will largely be inactive.
macOS is designed to show a green indicator light next to your webcam when it is actively in use. If you want to use your webcam, you’ll need to go back into these settings and grant permission to the specific app you wish to use.
Method 3: Revoking Browser Permissions
Many video calls and online meetings happen directly within your web browser. If you want to disable your webcam temporarily for specific websites or for all websites, your browser’s settings offer precise controls.
For Specific Websites in Your Web Browser
Here’s how to manage camera permissions in popular web browsers:
Visual guide about How to Disable Webcam Temporarily
Image source: i.ytimg.com
Google Chrome
- Step 1: Access Site Settings (Method A – For a Specific Site).
- While on a website that might request camera access (or has previously done so), click the padlock icon to the left of the website address in the address bar.
- Select “Site settings.”
- Find “Camera” in the permissions list and change its setting to “Block” or “Ask (default).”
- Step 2: Access Global Camera Settings (Method B – For All Sites).
- Click the three vertical dots (Menu) in the top-right corner of Chrome.
- Go to “Settings.”
- In the left sidebar, click “Privacy and security.”
- Click “Site Settings.”
- Scroll down and click “Camera.”
- Here, you can choose “Don’t allow sites to use your camera” to disable your webcam temporarily for all websites by default. You can also review “Allowed to use your camera” and “Blocked from using your camera” lists and remove or add sites as needed.
Mozilla Firefox
- Step 1: Access Site Permissions (Method A – For a Specific Site).
- On a website requesting camera access, click the padlock icon to the left of the address bar.
- Click the arrow next to “Permissions” (or “Connection secure”).
- Find “Use the Camera” and select “Block” from the dropdown menu.
- Step 2: Access Global Camera Settings (Method B – For All Sites).
- Click the three horizontal lines (Menu) in the top-right corner of Firefox.
- Go to “Settings.”
- In the left sidebar, click “Privacy & Security.”
- Scroll down to the “Permissions” section.
- Click the “Settings…” button next to “Camera.”
- Here, you can review and remove sites that have “Allow” access. To disable your webcam temporarily for all sites by default, check the “Block new requests asking to access your camera” box.
Microsoft Edge
- Step 1: Access Site Permissions (Method A – For a Specific Site).
- On a website that uses your camera, click the padlock icon to the left of the address bar.
- Click “Permissions for this site.”
- Find “Camera” and change the permission to “Block” from the dropdown.
- Step 2: Access Global Camera Settings (Method B – For All Sites).
- Click the three horizontal dots (Menu) in the top-right corner of Edge.
- Go to “Settings.”
- In the left sidebar, click “Cookies and site permissions.”
- Scroll down and click “Camera.”
- Here, you can toggle off “Ask before accessing (recommended)” to block all new requests, effectively disabling your webcam temporarily for new sites. You can also manage the “Allow” and “Block” lists for individual websites.
Practical Tips for Temporary Webcam Disablement
When you decide to disable your webcam temporarily, keep these additional tips in mind to ensure maximum privacy and convenience:
Visual guide about How to Disable Webcam Temporarily
Image source: thewindowsclub.com
- Test After Disabling: After applying any software-based method to disable your webcam temporarily, always open an application that uses the camera (like your OS’s built-in camera app, Zoom, or Google Meet) to confirm that the webcam is indeed off. You should see a blank screen or an error message.
- Remember to Re-enable: These methods are for temporary disablement. Make a mental note or set a reminder to re-enable your webcam when you actually need it for a video call or recording.
- Layer Your Security: For ultimate peace of mind, consider using a physical cover in conjunction with software-based methods. This provides multiple layers of protection against unwanted access.
- Regularly Review Privacy Settings: Periodically check your operating system and browser privacy settings to ensure no unauthorized apps or websites have gained camera access.
Troubleshooting Common Issues
Sometimes, even after following the steps to disable your webcam temporarily, you might encounter issues. Here’s how to troubleshoot some common problems:
Webcam Still Active After Disabling?
- Restart Your Device: A simple restart can often resolve lingering software conflicts or ensure that new settings are fully applied.
- Check All Methods: If you disabled it via Device Manager, but an app still accesses it, perhaps a privacy setting is overriding it, or vice versa. Ensure all relevant settings (Device Manager, OS Privacy, Browser Permissions) are set to disable.
- Update Drivers: Outdated or corrupted camera drivers can sometimes cause erratic behavior. Try updating your camera drivers through Device Manager or your manufacturer’s website.
- Malware Scan: In rare cases, persistent webcam activity might indicate malware. Run a full scan with reputable antivirus software.
Can’t Find the Webcam in Device Manager (Windows)?
- Look Under Different Categories: Your webcam might be listed under “Cameras,” “Imaging devices,” or “Sound, video and game controllers.” Expand all of these categories to check.
- Show Hidden Devices: In Device Manager, click “View” > “Show hidden devices.” Sometimes, a temporarily disconnected or malfunctioning device might be hidden.
- Scan for Hardware Changes: Click “Action” > “Scan for hardware changes.” This can prompt Windows to redetect the webcam.
- Check BIOS/UEFI: On some laptops, the webcam can be disabled at the BIOS/UEFI level. Consult your device’s manual or manufacturer’s support for instructions on accessing and checking these settings. This is a more advanced step.
Trouble Re-enabling the Webcam?
- Reverse Your Steps: Go back through the exact steps you used to disable your webcam temporarily and reverse them (e.g., “Enable device” in Device Manager, “Camera access” on in Privacy Settings).
- Check for Conflicting Settings: If you used multiple methods (e.g., Device Manager AND Privacy Settings), make sure you’ve re-enabled it in ALL places.
- Driver Issues: If enabling doesn’t work, try uninstalling the webcam driver in Device Manager (check the “Delete the driver software for this device” box if available and you have an internet connection for Windows to re-download it). Then, restart your computer. Windows will typically reinstall the driver automatically.
Conclusion
Being able to disable your webcam temporarily gives you peace of mind and significantly boosts your digital privacy. Whether you opt for the foolproof simplicity of a physical cover, the comprehensive control of your operating system’s settings, or the targeted approach of browser permissions, you now have the knowledge to secure your camera. Remember to test your settings, be mindful of when your camera is active, and always prioritize your privacy in an increasingly connected world. Taking these simple steps empowers you to control your visual presence and enjoy your digital life with greater confidence.



