


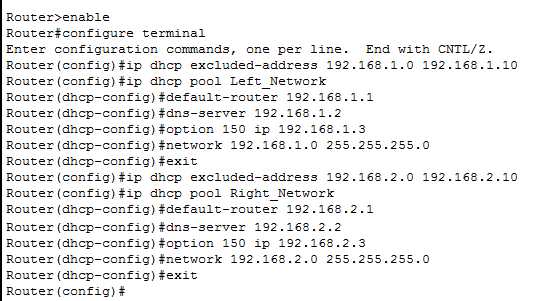
To enable DHCP on your router, simply access its admin panel, locate the DHCP settings, and turn it on. Doing this will allow your network devices to automatically receive IP addresses, making your network easier to manage. With just a few clicks, you can activate DHCP and ensure seamless connectivity for all your devices.
Enabling DHCP on a router is straightforward and vital for simplifying your network setup. This process automates IP address assignment, eliminating the need for manual configuration on each device. Whether you’re setting up a new home network or troubleshooting connectivity issues, turning on DHCP ensures your devices communicate effortlessly. In this guide, you’ll learn the simple steps to activate DHCP on most routers, so you can enjoy a more efficient and user-friendly network experience.

How to Enable DHCP on Router
Understanding DHCP and Its Role in Your Network
DHCP stands for Dynamic Host Configuration Protocol. It helps assign IP addresses to devices on your network automatically.
Without DHCP, each device would need a manual IP address, which can be confusing and time-consuming.
Enabling DHCP makes connecting multiple devices easier and keeps your network organized and efficient.
Why You Might Want to Enable DHCP
Most routers have DHCP enabled by default, simplifying setup for many users.
If you have a small home network or office, DHCP ensures devices get unique IP addresses without manual setup.
Disable DHCP only if you’re assigning static IP addresses to devices or managing IP addresses outside the router.
Accessing Your Router’s Admin Panel
To enable DHCP, you first need to log in to your router’s admin interface.
Open a web browser and type the router’s IP address into the address bar. Common IP addresses include 192.168.0.1 or 192.168.1.1.
Enter your username and password—these are usually printed on the router or set during initial setup.
If you don’t know the login info, check your router’s manual or perform a reset to default settings.
Locating DHCP Settings in the Router Interface
Once logged in, navigate to the network or LAN settings section.
Look for a menu labeled DHCP Server, DHCP Settings, or similar.
This is where you’ll see options to enable or disable DHCP and configure related settings.
Enabling DHCP on Your Router
Step-by-Step Guide
- Find the DHCP server setting and select Enable.
- Specify the IP address range for DHCP to assign to devices, called the DHCP pool.
- Set the subnet mask, usually 255.255.255.0 for most home networks.
- Enter the default gateway IP, which is typically your router’s IP address.
- Configure the lease time, or how long a device keeps the assigned IP before requesting a new one.
- Save your settings to activate DHCP on the router.
Configuring IP Address Range and Lease Time
Choosing the Right IP Range
Select a range of IP addresses that does not conflict with static IPs or other network devices.
For example, if your router’s IP is 192.168.1.1, you might set DHCP range from 192.168.1.100 to 192.168.1.200.
This allows you to assign static IPs outside this range if needed.
Understanding Lease Time
Lease time is how long a device keeps its assigned IP address before renewing it.
Short lease times, like 1 hour, are good for dynamic environments, while longer lease times suit stable networks.
Adjust this setting based on your network usage and device mobility.
Verifying DHCP Functionality
After saving settings, connect a device to your network.
Check if it automatically receives an IP address within your specified range.
If not, revisit the DHCP settings and troubleshoot the connection or configuration errors.
Troubleshooting Common DHCP Issues
Device Not Getting an IP Address
Ensure DHCP is enabled on the router and the device is set to obtain an IP address automatically.
Restart the device or refresh its network connection to request a new address.
If problems persist, verify DHCP range conflicts or reset your router.
Conflict or Duplicate IP Addresses
Check for static IPs within the DHCP range that may cause conflicts.
Adjust static IPs outside the DHCP pool to avoid overlaps.
Ensure the DHCP lease time allows for enough IP availability.
Best Practices for Managing DHCP on Your Router
- Regularly update your router’s firmware to fix bugs and improve DHCP performance.
- Use a clear and logical IP address scheme for easy management.
- Limit DHCP scope to avoid running out of IP addresses during peak usage.
- Document static IPs assigned outside the DHCP range for future reference.
Additional Settings to Consider
DHCP Reservations
This feature allows you to assign specific IPs to certain devices based on MAC addresses, ensuring they always get the same IP.
It is useful for network printers or servers requiring fixed IPs while still using DHCP.
Enabling or Disabling DHCP on Different Router Brands
Interface labels vary by manufacturer—refer to your router’s manual for exact steps.
Popular brands like TP-Link, Netgear, Asus, and Cisco have user-friendly interfaces for DHCP management.
Always ensure you save changes after configuring DHCP settings.
Enabling DHCP on your router is a straightforward process that greatly simplifies network management.
By correctly configuring DHCP, you ensure all your devices connect smoothly without manual IP setup.
Regularly review your DHCP settings to keep your network running efficiently and troubleshoot any connectivity issues promptly.
How to Enable DHCP on any router?
Frequently Asked Questions
What are the initial steps to enable DHCP on a router?
To enable DHCP on your router, connect your computer to the router via Ethernet or Wi-Fi. Access the router’s admin interface by entering its IP address into a web browser. Log in with your username and password. Once logged in, navigate to the network or LAN settings section, and locate the DHCP server options. Enable the DHCP server, specify the IP address range you want to assign to devices, and save your settings.
How can I verify that DHCP is working correctly after enabling it?
After activating DHCP, connect a device to the network either through Ethernet or Wi-Fi. Check the device’s network settings to see if it has received an IP address within the specified range. You can also use command-line tools like ‘ipconfig’ (Windows) or ‘ifconfig’ (macOS/Linux) to view the assigned IP address. If the device receives an IP address automatically, DHCP operates correctly.
What should I do if DHCP does not allocate IP addresses as expected?
If devices are not receiving IP addresses automatically, first verify that the DHCP server is enabled on your router. Ensure that the DHCP range does not conflict with static IP addresses assigned manually. Restart the router to refresh settings. On the client devices, disable any static IP configurations. If issues persist, check for firmware updates or reset the router to factory defaults and reconfigure DHCP settings.
Final Thoughts
Enabling DHCP on your router ensures devices connect seamlessly to your network. First, access your router’s admin panel by entering its IP address in your browser. Locate the DHCP settings under the network or LAN section. Turn on DHCP and save the changes.
Knowing how to enable DHCP on router simplifies network management and improves connectivity. Follow these straightforward steps to activate DHCP and keep your network running smoothly.



