To enable port forwarding on your router quickly, access your router’s admin panel, locate the port forwarding section, enter the required port numbers, and save your settings. This simple process allows you to direct specific traffic to designated devices on your network, improving gaming, remote access, or hosting capabilities.
Port forwarding is a handy trick to make your digital life smoother by opening specific pathways through your router’s defenses. Whether you’re setting up a game server, accessing a security camera remotely, or running a home media server, enabling port forwarding is essential. It may seem daunting at first, but with a few straightforward steps—logging into your router, finding the right settings, and entering the correct port information—you’ll have everything configured in no time. This guide will walk you through the process step-by-step so you can enjoy seamless connectivity and maximize your network’s potential.

How to Enable Port Forwarding in Router
Enabling port forwarding on your router is an essential step to allow specific applications or devices on your network to communicate with devices outside your network. It essentially opens a direct pathway through your router’s firewall to a designated device or service. This process can seem complicated at first, but with clear steps, you’ll be able to do it easily and securely.
Understanding Port Forwarding and Its Benefits
Port forwarding directs incoming internet traffic to a specific device within your local network. It’s particularly useful for online gaming, hosting a server, remote desktop access, or using VoIP services. By configuring port forwarding, you ensure that data reaches the correct device without exposing your entire network to potential threats.
One significant benefit of port forwarding is improved connectivity. Without it, certain applications might not work properly because they cannot communicate through your router’s firewall. It also helps in reducing lag and improving the speed of data transfer for applications that require continuous or real-time connections.
Prerequisites for Setting Up Port Forwarding
Before starting, gather some important information about your network. You will need the IP address of the device you want to forward ports to, known as the local or private IP address. You should also know the specific port number or range required by your application or device.
It’s advisable to assign a static IP address to the device to prevent it from changing after restarts. Additionally, knowing your router’s admin username and password helps in gaining access to the configuration settings. Make sure your router firmware is up to date, as this can affect the availability of port forwarding features.
Finding Your Router’s IP Address and Login Details
To access your router’s settings, you need its IP address. Common default IP addresses are 192.168.0.1 or 192.168.1.1. You can find this information in your router’s manual or on the device itself.
On a Windows device, open Command Prompt and type ipconfig. Look for the “Default Gateway” entry – that is your router’s IP address. For Mac users, go to System Preferences, then Network, select your connection, and click Advanced to find the router’s IP.
Login details are typically set to default “admin” for both username and password unless you or your ISP changed them. If you don’t know your credentials, consult your router’s manual or contact your internet service provider.
Accessing Your Router’s Configuration Page
Enter your router’s IP address into a web browser’s address bar. This will prompt for your login credentials. Once logged in, you will see the router’s main configuration dashboard.
Note: Sometimes, routers have a different interface depending on the manufacturer or model, but the general setup process remains similar. If you have trouble logging in, try resetting your router to factory settings or consult the user manual.
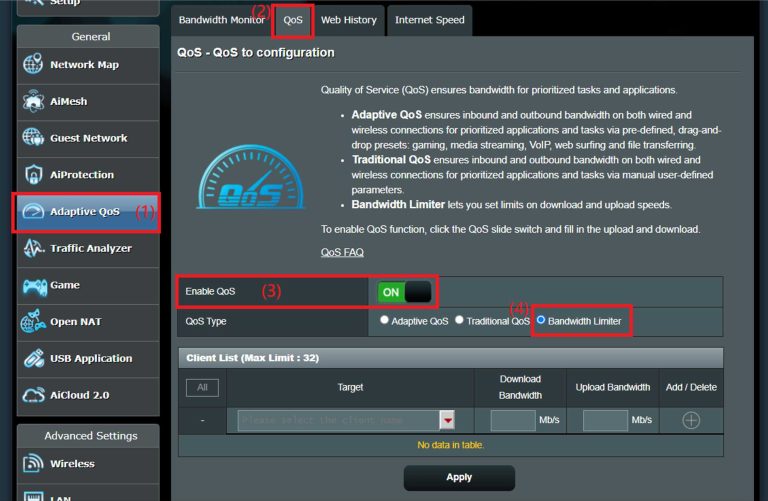
Locating Port Forwarding Settings
Within your router’s interface, look for sections labeled “Port Forwarding”, “Apps and Gaming”, “NAT”, or “Virtual Servers”. This section allows you to create and manage port forwarding rules. If you cannot find it, use the search function or check the router’s manual for guidance.
Creating a Port Forwarding Rule
The next step is to create a new port forwarding rule. You will typically need to input the following information:
- Service Name: An identifiable name for the rule (e.g., “Minecraft Server”)
- Port Range: The port number or range used by your application (e.g., 25565)
- Local IP Address: The IP address of the device receiving the forwarded ports
- Protocol: Either TCP, UDP, or both, depending on the application’s requirements
Once filled out, save or apply the rule to activate port forwarding.
Testing Your Port Forwarding Setup
After configuring, it’s important to verify if ports are correctly forwarded. Use online tools like “Can You See Me?” or “YouGetSignal” to test whether the port is accessible from outside your network.
If the port appears closed, revisit your settings to ensure the IP address and ports are correctly entered. Also, check if your firewall or antivirus software might be blocking the ports and adjust settings accordingly.
Additional Tips for Successful Port Forwarding
Ensure your device has a static IP address that does not change to keep port forwarding consistent. Use your router’s DHCP reservation feature to assign a fixed IP.
Regularly update your router’s firmware to stay protected against vulnerabilities. If problems persist, restart your router and the device you’re forwarding ports to, as sometimes this can resolve connectivity issues.
Understanding Common Port Numbers and Protocols
Knowing which ports to open is crucial. Some common ports include:
| Application | Port Number | Protocol |
|---|---|---|
| Web Server (HTTP) | 80 | TCP |
| Secure Web (HTTPS) | 443 | TCP |
| FTP Server | 21 | TCP |
| Online Gaming | Various (depending on the game) | TCP/UDP |
| VoIP | Various (e.g., 5060 for SIP) | UDP |
Always check application documentation for the exact ports needed. Opening unnecessary ports can pose security risks, so only open the ports required for your purpose.
Security Considerations When Using Port Forwarding
While port forwarding improves connectivity, it also exposes certain services to the internet. Always ensure that your devices have the latest security patches.
Use strong, unique passwords for devices and services. Consider using a VPN for added security, especially when accessing your network remotely.
If you notice suspicious activity, review your port forwarding rules and disable any unused or risky ports promptly.
Alternatives to Manual Port Forwarding
Some modern routers offer UPnP (Universal Plug and Play), which allows applications to automatically manage port forwarding rules. Enable UPnP only if you trust the devices and applications on your network.
For advanced users, setting up a DMZ (Demilitarized Zone) can expose a single device to the internet, bypassing port forwarding. However, this method should be used cautiously due to security concerns.
Summary of Steps to Enable Port Forwarding in Router
- Gather necessary details: device IP, port numbers, and protocol.
- Access your router’s admin panel via its IP address.
- Log in with your credentials.
- Navigate to the port forwarding section.
- Create a new rule with the device’s static IP and port details.
- Save and apply your settings.
- Test the port forwarding to verify successful setup.
By following these detailed steps, you’ll be able to configure port forwarding effectively for your network needs. Remember to keep your router’s firmware updated and monitor your network for security. Proper port forwarding ensures better connectivity while maintaining safety for your network environment.
Beginners Guide to Port Forwarding
Frequently Asked Questions
How can I access my router’s configuration page to enable port forwarding?
To access your router’s configuration page, connect your computer or device to the router via Ethernet cable or Wi-Fi. Open a web browser and enter the router’s IP address, typically 192.168.1.1 or 192.168.0.1, into the address bar. Enter the login credentials, often found on a label on the router or in the user manual. Once logged in, navigate to the port forwarding section within the settings or advanced options.
What steps should I follow to specify the internal and external ports for forwarding?
After locating the port forwarding settings, create a new rule or entry. Enter the external port number that you want to open for public access, and specify the internal port on the device that will handle the traffic. Ensure that you select the correct protocol, either TCP, UDP, or both, depending on the application requirements. Save your settings to activate the port forwarding rule.
How do I ensure my firewall settings do not block forwarded ports?
Check your device’s firewall or security software to confirm that it allows incoming connections on the ports you are forwarding. Add an exception or rule for these specific ports, allowing traffic to pass through. This step helps prevent the firewall from blocking legitimate connections that rely on port forwarding.
What should I do if port forwarding doesn’t work after configuration?
Verify that you entered the correct IP address for the device you want to forward ports to. Confirm that the device is powered on and connected to the network. Restart your router to apply new settings, and check whether your ISP has any restrictions or firewall rules that might interfere. Use online tools to test if the ports are open and accessible from outside your network.
Is it necessary to assign a static IP address to my device for port forwarding?
Yes, assigning a static IP address to the device ensures that its IP address remains consistent. This stability prevents the port forwarding rules from breaking if the device’s IP address changes due to DHCP reassignment. Set a static IP through your device’s network settings or within your router’s DHCP reservation options.
Final Thoughts
To enable port forwarding in router, access your router’s admin panel through a web browser. Find the port forwarding or virtual server section in the settings. Enter the specific port number and the IP address of your device. Save the changes and test the connection to ensure proper setup. Understanding these steps makes the process simple and efficient. Remember, knowing how to enable port forwarding in router helps improve your network’s functionality and security.

I specialize in process engineering and system optimization. I enjoy writing guides that simplify troubleshooting and help improve efficiency in everyday tech use.