



Don’t let a blurry webcam ruin your video calls! This guide provides easy-to-follow steps to troubleshoot and fix common clarity issues. Learn how to perform physical checks, adjust software settings, update drivers, and optimize your environment to achieve a sharp, clear image every time. Most blurry webcam problems are easily fixable with a little patience and the right know-how.
How to Fix Blurry Webcam
Are you tired of looking like a pixelated ghost on your video calls? A blurry webcam can be incredibly frustrating, whether you’re joining a crucial work meeting, catching up with family, or trying to stream online. It makes you appear unprofessional and can hinder effective communication. The good news is that most blurry webcam issues are fixable, and you don’t need to be a tech expert to solve them!
In this comprehensive guide, we’ll walk you through simple, step-by-step instructions to diagnose and fix your blurry webcam. We’ll cover everything from basic physical checks to advanced software adjustments, helping you achieve a crisp, clear image every time. Let’s get that blurry webcam fixed and get you looking sharp!
Key Takeaways
- Start with Physical Checks: Always begin by cleaning your webcam lens with a microfiber cloth and checking for any physical obstructions or loose connections.
- Adjust Webcam Settings: Utilize your webcam’s native software or video conferencing app settings to fine-tune focus, exposure, resolution, and frame rate for optimal clarity.
- Update or Reinstall Drivers: Outdated or corrupted drivers are a common cause of a blurry webcam. Ensure your webcam drivers are up to date via Device Manager or the manufacturer’s website.
- Ensure Good Lighting: Proper lighting, ideally from the front, dramatically improves image quality and can make a blurry webcam appear much clearer. Avoid strong backlighting.
- Check for Software Conflicts: Multiple applications trying to use your webcam simultaneously or background processes can degrade video quality. Restarting your computer can often resolve these issues.
- Optimize Your Environment: A stable internet connection and closing unnecessary background apps can prevent your video stream from appearing blurry due to system strain.
Why is Your Webcam Blurry? Understanding the Causes
Before we dive into solutions, it helps to understand why your webcam might be blurry in the first place. Common culprits for a blurry webcam include:
- Dirty Lens: The simplest and most common reason.
- Incorrect Focus: If your webcam has manual focus or autofocus isn’t working correctly.
- Outdated Drivers: Software that helps your computer communicate with the webcam might be old.
- Poor Lighting: Insufficient light forces the camera to compensate, leading to graininess or blur.
- Incorrect Software Settings: Resolution, exposure, or other settings might be improperly configured.
- Hardware Issues: A faulty USB cable, port, or even the webcam itself could be the problem.
- Internet Bandwidth: A slow connection can make your video stream look blurry, even if the camera is good.
Don’t worry; we’ll tackle each of these potential causes for your blurry webcam.
Step 1: Start with the Basics – Physical Checks
Sometimes, the easiest solutions are the most effective. Always begin with these quick physical checks to fix a blurry webcam.
Visual guide about How to Fix Blurry Webcam
Image source: thewindowsclub.com
Clean Your Webcam Lens
This might sound obvious, but it’s often overlooked. Fingerprints, dust, and smudges can easily accumulate on your webcam lens, making your image appear blurry.
- How to Clean: Gently wipe the lens with a clean, dry microfiber cloth. This is the same type of cloth you’d use for eyeglasses or camera lenses.
- What NOT to Use: Avoid abrasive materials, paper towels, or strong chemical cleaners, as these can scratch the lens or damage its coating. If needed, a tiny drop of distilled water on the cloth can help with stubborn smudges, but ensure it’s barely damp.
Check for Physical Obstructions
Is there anything blocking your webcam’s view? It happens more often than you think!
- Protective Film: Many new webcams come with a thin plastic film over the lens. Make sure it’s removed.
- Privacy Shutters: If your webcam has a physical privacy shutter, ensure it’s fully open.
- Stickers or Tape: Double-check that no stray stickers or tape are partially covering the lens.
Ensure Proper Lighting
Lighting plays a huge role in video quality. Poor lighting can make even the best webcam look blurry.
- Frontal Lighting is Key: Position a light source (like a window or a lamp) in front of you, facing your face. This illuminates you directly, making your image clear and reducing shadows.
- Avoid Backlighting: Don’t sit with a bright window or lamp directly behind you. This will make your face appear dark and shadowy, and your webcam might struggle to focus, leading to a blurry image.
- Adequate Brightness: Ensure there’s enough light in your room. A dimly lit environment will force your webcam to increase its ISO sensitivity, resulting in a grainy and often blurry webcam picture.
Check USB Connection and Cable
A loose or faulty connection can also cause a blurry webcam or even prevent it from working altogether.
- Firm Connection: Ensure your webcam’s USB cable is firmly plugged into your computer’s USB port.
- Try a Different Port: If it’s still blurry, try plugging the webcam into a different USB port on your computer. Sometimes, certain ports can be faulty or provide insufficient power.
- Test Another Cable (if removable): If your webcam has a removable cable, try swapping it out for a different one to rule out a damaged cable.
Step 2: Adjusting Webcam Settings for Clarity
Once you’ve done the physical checks, it’s time to dive into your computer’s settings. Software adjustments are crucial for fixing a blurry webcam.
Visual guide about How to Fix Blurry Webcam
Image source: thewindowsclub.com
Use Your Webcam’s Native Software/App
Many webcams come with their own dedicated software or a control panel within your operating system that allows you to fine-tune settings.
- Windows: You can often access basic webcam settings through the built-in “Camera” app. More advanced options might be found in your webcam’s manufacturer-provided software (e.g., Logitech Capture for Logitech cameras). Look for settings like “Focus,” “Exposure,” “White Balance,” “Brightness,” and “Contrast.”
- macOS: While macOS has fewer native camera controls, some third-party apps like Camera Settings Pro or your webcam’s own software can offer more in-depth adjustments.
- Adjust Focus: If your webcam has manual focus (a physical ring around the lens) or an autofocus setting in its software, play with it until your image is sharp. This is a primary culprit for a blurry webcam.
Adjust Settings in Video Conferencing Apps
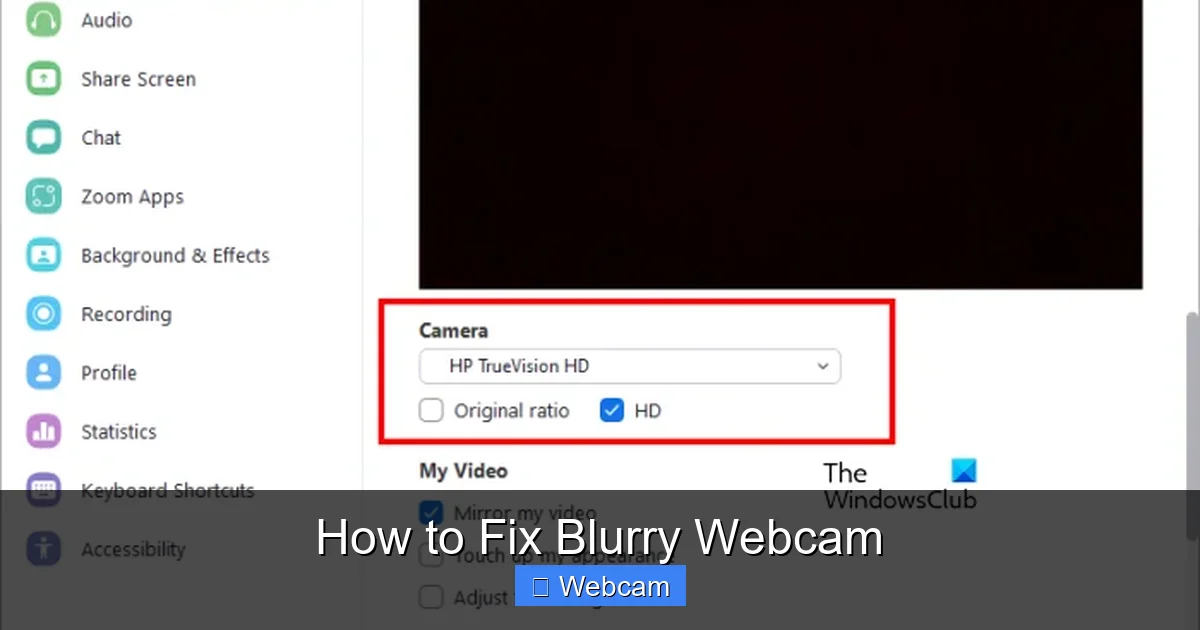
Most video conferencing platforms (Zoom, Microsoft Teams, Google Meet, Skype) have their own video settings that can override or influence your webcam’s output.
- Access Video Settings: In your chosen app, go to Settings > Video (or similar).
- Select Correct Camera: Ensure the correct webcam is selected if you have multiple cameras.
- Enable HD/High Quality: Look for options like “Enable HD,” “Original Ratio,” or “High Quality Video” and ensure they are turned on. Sometimes, these are off by default to save bandwidth, leading to a blurry image.
- Adjust Brightness/Contrast: Some apps allow you to tweak basic image settings directly within their interface.
Manual Focus (If Applicable)
Some higher-end webcams have a physical focus ring around the lens. If yours does, gently twist it until your image on the screen becomes sharp. This is a direct way to fix a blurry webcam if it’s a focus issue.
Check Resolution and Frame Rate
These settings determine the clarity and smoothness of your video. A lower resolution will inherently look more blurry.
- Higher Resolution: Aim for 720p (HD) or 1080p (Full HD) if your webcam supports it. A resolution like 480p will always look somewhat blurry compared to higher options.
- Frame Rate: 30 frames per second (fps) is standard for smooth video. While frame rate doesn’t directly cause blur, a very low frame rate can make movement appear choppy and less clear.
- Balance: Remember that higher resolution and frame rates require more processing power and internet bandwidth. If your computer or connection struggles, try a slightly lower setting to maintain clarity without stuttering.
Step 3: Software and Driver Solutions
Software issues, particularly with drivers, are a common reason for a blurry webcam. Let’s get these sorted.

Visual guide about How to Fix Blurry Webcam
Image source: thewindowsclub.com
Update Webcam Drivers
Drivers are essential software that allows your computer to communicate properly with your webcam. Outdated or corrupted drivers can lead to a blurry webcam or even stop it from working.
- Windows:
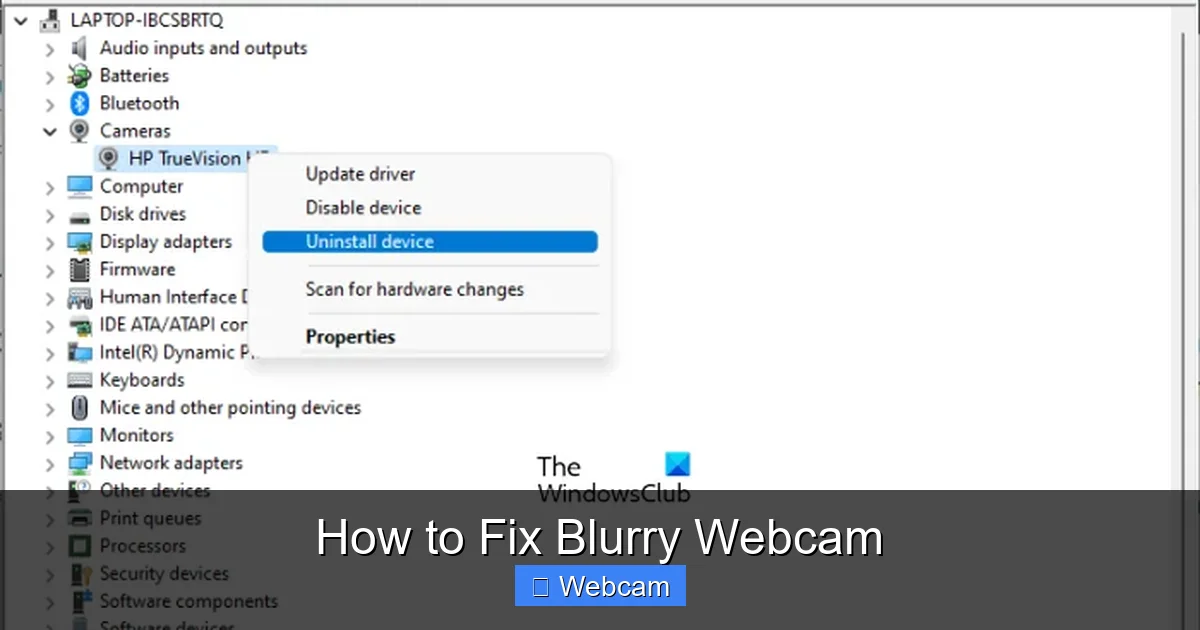
- Right-click the Start button and select “Device Manager.”
- Expand “Cameras” or “Imaging devices.”
- Right-click on your webcam (e.g., “Logitech Webcam C920” or “Integrated Webcam”).
- Select “Update driver.”
- Choose “Search automatically for drivers.”
If Windows doesn’t find a new driver, visit your webcam manufacturer’s website (e.g., Logitech, Microsoft, Razer, HP) and download the latest drivers directly for your specific model.
- macOS: Macs generally handle webcam drivers automatically through system updates. Ensure your macOS is up to date via System Settings > General > Software Update. For external webcams, check the manufacturer’s website for Mac-specific software or drivers.
Reinstall Webcam Drivers
If updating doesn’t work, a clean reinstall can often resolve deeper driver conflicts causing a blurry webcam.
- Windows:
- Go to Device Manager (as above).
- Right-click your webcam.
- Select “Uninstall device.”
- Check the box that says “Attempt to remove the driver software for this device” if available, then click “Uninstall.”
- Restart your computer. Windows will usually automatically detect the webcam and reinstall the drivers upon restart.
Check for Conflicting Software
Sometimes, multiple applications trying to access your webcam simultaneously can cause conflicts, leading to a blurry webcam or freezing.
- Close Unnecessary Apps: Ensure only one application is using your webcam at a time. Close any other video apps, streaming software, or virtual camera tools.
- Virtual Camera Software: If you use software like OBS Virtual Camera or Snap Camera, ensure it’s configured correctly or disabled if you want to use your raw webcam feed. Sometimes these can introduce their own processing that affects clarity.
Restart Your Computer
The age-old IT solution! A simple restart can often resolve temporary software glitches, clear memory, and reset connections that might be causing your blurry webcam.
Step 4: Environmental and Performance Considerations
Even with a perfectly configured webcam, external factors can make your video appear blurry.
Optimize Your Internet Connection
A weak or unstable internet connection can lead to choppy, pixelated, or blurry video streams, even if your webcam is capable of high quality.
- Wired Connection: If possible, use an Ethernet cable to connect your computer directly to your router. This provides a more stable and faster connection than Wi-Fi.
- Reduce Bandwidth Usage: Close other applications that might be hogging your internet bandwidth (e.g., streaming services, large downloads, online games).
- Check Internet Speed: Run an internet speed test (e.g., Speedtest.net) to ensure you have adequate upload speed for video calls (generally 2-5 Mbps upload for HD video).
Close Background Applications
Your computer’s processing power (CPU and RAM) is needed for encoding and streaming video. If too many other apps are running, your computer might struggle, causing a blurry or stuttering video feed.
- Task Manager (Windows): Press Ctrl+Shift+Esc to open Task Manager. Look for processes consuming a lot of CPU or memory and close any non-essential ones.
- Activity Monitor (macOS): Open Activity Monitor (Applications > Utilities) to see which apps are using significant resources.
Test with Different Applications
Is your webcam blurry in all applications or just one specific program?
- Test in Browser: Try using your webcam on an online test site (e.g., webcamtests.com) or within a simple browser-based video call (like Google Meet in Chrome).
- Test in Native Camera App: Use your operating system’s built-in camera app (Windows Camera or Photo Booth on Mac) to see if the blur persists there.
If the blurry webcam issue only appears in one specific app, the problem likely lies with that application’s settings or its installation, rather than the webcam itself.
Troubleshooting Common Blurry Webcam Scenarios
Let’s address a few specific situations you might encounter when trying to fix a blurry webcam.
Webcam Blurry Only in One App
If your webcam looks great in the Windows Camera app or on a test website but is blurry in Zoom or Teams:
- Check App-Specific Settings: Revisit the video settings within that particular application. Ensure HD is enabled, and try adjusting other image quality options there.
- Reinstall the Application: If settings don’t help, try uninstalling and reinstalling the problematic video conferencing application. Corrupted app files can sometimes cause a blurry webcam output.
Webcam Suddenly Became Blurry
Did your webcam used to be clear, but now it’s blurry?
- Recent Updates: Did you recently update your operating system, webcam drivers, or the video conferencing app? Sometimes updates introduce bugs. Try rolling back drivers or checking for further updates that might fix the issue.
- New Software: Have you installed any new software, especially anything that interacts with your camera (e.g., virtual camera apps, privacy tools)? They might be interfering.
- Physical Bump: Has the webcam been bumped or moved? Recheck physical connections and lens focus.
Built-in Laptop Webcam Blurry
Laptop webcams can be trickier because you can’t easily swap them out or physically adjust them.
- Focus on Drivers & Software: For built-in cameras, driver updates, operating system updates, and adjusting settings within video apps are your primary tools.
- Lighting is Crucial: Laptop webcams are often low-quality. Excellent lighting becomes even more critical to make a blurry webcam appear better.
- Hardware Limitations: Sometimes, the built-in webcam simply isn’t very good and might always have a somewhat blurry or grainy image compared to external webcams.
When All Else Fails: Consider an Upgrade
If you’ve tried all the above steps and your webcam is still frustratingly blurry, it might be time to consider that your webcam itself is the problem. Older or very cheap webcams often lack the hardware to produce a truly sharp image, especially in less-than-ideal lighting.
When buying a new webcam, look for features like:
- Full HD (1080p) or 4K Resolution: For crisp details.
- Autofocus: To ensure you’re always in focus.
- Good Low-Light Performance: Look for webcams with larger sensors or better optics.
- Reputable Brands: Logitech, Razer, Anker, Microsoft, and Dell are often reliable choices.
Conclusion
Dealing with a blurry webcam can be a nuisance, but as you’ve seen, there are many straightforward steps you can take to improve your video quality. From simply wiping the lens clean to updating drivers and optimizing your software settings, most blurry webcam issues can be resolved with a bit of patience and troubleshooting.
Remember to work through the steps systematically, starting with the easiest physical checks and moving towards software solutions and environmental factors. By following this guide, you should be able to transform your blurry webcam feed into a clear, professional-looking image for all your online interactions. Say goodbye to the blurry you and hello to crystal-clear video!



