


Is your webcam image fuzzy or out of focus? This guide walks you through simple, effective fixes to restore sharp, clear video on Windows 10. From cleaning the lens to updating drivers, we’ve got you covered.
Key Takeaways
- Clean the webcam lens: Dust and smudges are common causes of blurry video—use a microfiber cloth for best results.
- Adjust focus and settings: Some webcams have manual focus rings; others rely on software settings like brightness and contrast.
- Update or reinstall drivers: Outdated or corrupted drivers can degrade image quality—always use the latest version.
- Check app-specific settings: Apps like Zoom or Teams often have their own camera controls that override system settings.
- Disable background effects: Windows 10’s “Eye Contact” or background blur features can unintentionally soften your image.
- Test in different lighting: Poor lighting forces the camera to compensate, often resulting in grainy or blurry footage.
- Try a different USB port or app: Hardware conflicts or software bugs may be the real culprit.
Quick Answers to Common Questions
Tip/Question?
Can I fix a blurry webcam without third-party software?
Yes! Windows 10 has built-in tools like the Camera app and Device Manager. Most fixes—cleaning, settings, drivers—can be done natively.
Tip/Question?
Why does my webcam look worse in Zoom than in the Camera app?
Apps like Zoom apply filters (e.g., “Touch up my appearance”) that soften your image. Disable these features for sharper video.
Tip/Question?
Should I update my webcam driver regularly?
Yes—manufacturers release updates to improve performance and compatibility. Check every few months or after Windows updates.
Tip/Question?
Can lighting really affect webcam clarity?
Absolutely. Good lighting reduces noise and helps the camera focus better. Natural front lighting works best.
Tip/Question?
Is a higher resolution webcam always better?
Not necessarily. A 1080p webcam in poor lighting will look worse than a 720p one in good light. Focus on environment and settings first.
How to Fix Blurry Webcam on Windows 10
Having a blurry webcam can ruin video calls, online classes, or streaming sessions. Whether you’re using a built-in laptop camera or an external USB webcam, a fuzzy image is frustrating—but often fixable. In this guide, we’ll walk you through step-by-step solutions to get your Windows 10 webcam looking sharp and clear again. No technical expertise required!
Step 1: Clean the Webcam Lens
The simplest fix is often the most overlooked. Dust, fingerprints, or smudges on the lens can drastically reduce image quality.
Visual guide about How to Fix Blurry Webcam on Windows 10
Image source: thewindowsclub.com
How to Clean Safely
- Turn off your computer or disconnect the webcam.
- Use a clean, dry microfiber cloth (like one used for glasses or phone screens).
- Gently wipe the lens in a circular motion—avoid pressing too hard.
- If needed, lightly dampen the cloth with water or lens cleaner (never spray directly on the camera).
Pro tip: Avoid using tissues or paper towels—they can scratch the lens.
Step 2: Check Webcam Focus and Position
Some webcams, especially external ones, have a manual focus ring around the lens. If yours does, gently rotate it to adjust clarity.
Visual guide about How to Fix Blurry Webcam on Windows 10
Image source: thewindowsclub.com
For Fixed-Focus Webcams
Most built-in laptop cameras have fixed focus, meaning they’re optimized for a certain distance (usually 3–6 feet). Sit within this range for the sharpest image.
Reposition for Better Results
- Place your webcam at eye level—this improves angle and focus.
- Avoid backlighting (e.g., sitting with a window behind you), which can cause the camera to underexpose your face.
- Use a tripod or stand to stabilize the camera if it’s wobbly or tilted.
Step 3: Adjust Webcam Settings in Windows
Windows 10 includes built-in camera settings that can enhance image quality.

Visual guide about How to Fix Blurry Webcam on Windows 10
Image source: guidingtech.com
Access Camera Settings
- Open the Start menu and type “Camera.”
- Launch the Camera app.
- Click the Settings gear icon (top-right corner).
- Toggle off features like “Background blur” or “Eye contact effect”—these can soften your image.
- Adjust brightness, contrast, and saturation sliders to improve clarity.
Note: Not all webcams support manual adjustments in the Camera app. If sliders are grayed out, your hardware may not allow changes here.
Step 4: Update or Reinstall Webcam Drivers
Outdated or corrupted drivers are a common cause of poor webcam performance.
Check for Driver Updates
- Press Windows + X and select Device Manager.
- Expand the Cameras or Imaging devices section.
- Right-click your webcam and select Update driver.
- Choose Search automatically for updated driver software.
Reinstall the Driver (If Update Fails)
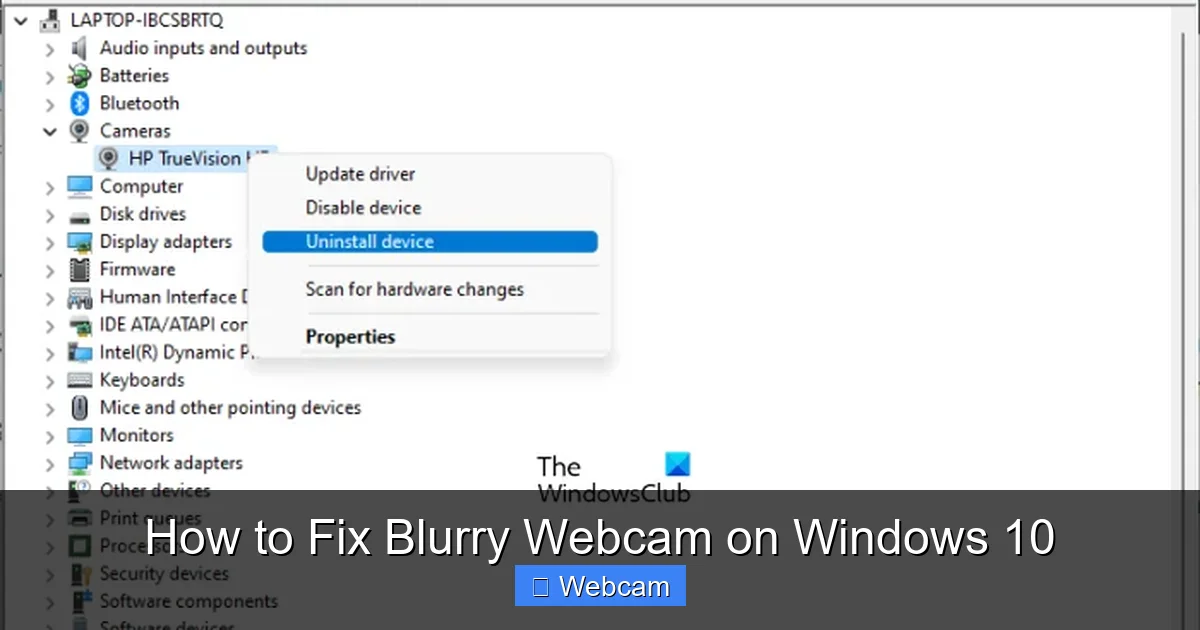
- In Device Manager, right-click the webcam again.
- Select Uninstall device and confirm.
- Restart your PC—Windows will automatically reinstall the driver.
Tip: For external webcams, visit the manufacturer’s website (e.g., Logitech, Microsoft) to download the latest driver manually.
Step 5: Check App-Specific Camera Settings
Apps like Zoom, Microsoft Teams, or Skype often have their own camera controls that override system settings.
Example: Adjusting Zoom Settings
- Open Zoom and go to Settings > Video.
- Toggle off “Touch up my appearance”—this feature softens your skin but can make you look blurry.
- Ensure “HD” is enabled if your webcam supports it.
- Click “Test Camera” to preview changes.
Repeat similar steps in other apps. Look for video enhancement or beauty filters and disable them for a more natural, sharper image.
Step 6: Improve Lighting Conditions
Webcams struggle in low light, often increasing ISO (sensitivity) which adds noise and blur.
Best Lighting Practices
- Face a natural light source (e.g., a window) during daytime.
- Use a ring light or desk lamp to illuminate your face evenly.
- Avoid overhead lighting that casts shadows under your eyes.
- Position lights in front of you, not behind.
Quick fix: Turn on room lights or use your phone’s flashlight (pointed at the wall, not your face) to bounce soft light.
Step 7: Disable Windows Background Effects
Windows 10 includes AI-powered features that can unintentionally blur your image.
Turn Off Eye Contact and Background Effects
- Go to Settings > Privacy > Camera.
- Scroll down and click “Background effects”.
- Set both “Background blur” and “Eye contact” to Off.
These features use processing power and may reduce image sharpness, especially on older hardware.
Step 8: Test with a Different App or USB Port
Sometimes the issue isn’t the webcam—it’s the app or connection.
Troubleshooting Steps
- Test your webcam in the Windows Camera app first.
- If it’s clear there, the problem is likely in your video conferencing app.
- For external webcams, try a different USB port—preferably USB 3.0 (blue) for better bandwidth.
- Avoid USB hubs; connect directly to the computer.
Bonus: Restart your computer after making changes—it helps apply updates and clear temporary glitches.
When to Consider Hardware Issues
If none of the above steps work, your webcam may have a hardware problem.
Signs of Hardware Failure
- Image is consistently blurry even after cleaning and adjustments.
- Camera isn’t detected by Windows.
- You see black screens, flickering, or distorted colors.
In these cases, consider replacing the webcam or contacting the manufacturer for support.
Conclusion
Fixing a blurry webcam on Windows 10 doesn’t have to be complicated. Start with the basics—clean the lens, check lighting, and adjust settings. Then move on to drivers and app-specific tweaks. Most issues are software-related and easily resolved. With these steps, you’ll enjoy crisp, clear video calls in no time. Remember: a little maintenance goes a long way!



