


Want to dramatically improve your webcam video quality? This guide provides practical, step-by-step advice covering everything from optimizing your lighting and environment to adjusting webcam settings and considering hardware upgrades. Follow these tips to ensure your video calls and streams look crisp, clear, and professional, making a lasting positive impression.
How to Improve Webcam Video Quality
In today’s connected world, your webcam is your window to colleagues, friends, family, and even new audiences. Whether you’re in a crucial business meeting, catching up with loved ones, or streaming your passion, having great webcam video quality isn’t just a luxury – it’s a necessity. A clear, well-lit image can convey professionalism, enhance communication, and simply make you look and feel more confident. No more pixelated faces or shadowy figures!
This comprehensive guide will walk you through practical, easy-to-follow steps to dramatically improve webcam video quality. We’ll cover everything from simple environmental tweaks to deep dives into software settings and hardware considerations. By the end, you’ll have all the tools and knowledge to elevate your online presence and ensure your video looks fantastic, every time. Let’s make your webcam footage shine!
Key Takeaways
- Master Your Lighting: Proper frontal lighting is the single most important factor for clear webcam video quality. Avoid backlighting at all costs.
- Optimize Your Environment: A clean, simple, and intentional background enhances professionalism and minimizes distractions.
- Adjust Webcam Settings: Dive into your webcam’s software to fine-tune resolution, white balance, exposure, and focus for the best possible image.
- Consider Hardware Upgrades: A dedicated external webcam often offers superior video quality, especially when paired with a sturdy mount.
- Position for Success: Place your webcam at eye level and maintain a comfortable distance for a more engaging and natural presence.
- Update Drivers & Software: Keep your webcam drivers current and explore enhancement features within your video conferencing applications.
Step 1: Optimize Your Environment (Lighting is Key!)
The single biggest factor affecting your webcam video quality isn’t usually the camera itself, but the lighting around you. Even the most expensive webcam will produce a poor image in bad lighting conditions. Getting this right is foundational.
Frontal Lighting is Your Friend
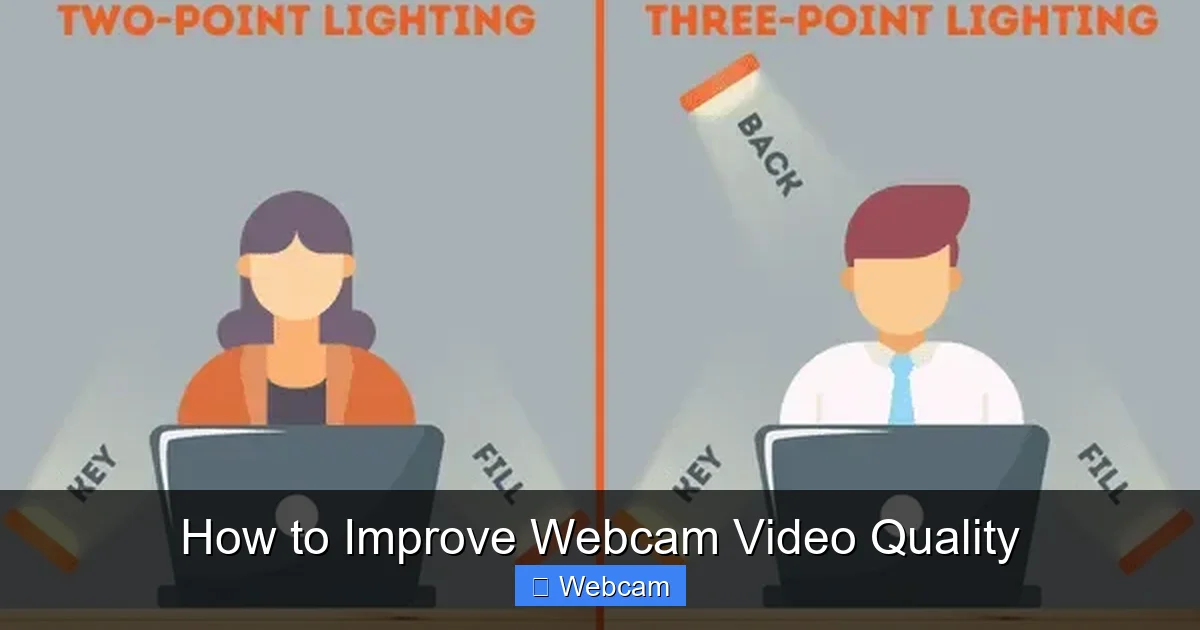
Imagine a light source directly in front of you, illuminating your face evenly. This is ideal. It eliminates harsh shadows and makes your face appear brighter and clearer. A window in front of you, or a lamp placed behind your webcam, works wonders.
Avoid Backlighting
Never have a bright light source (like a window) behind you. This will make you appear as a dark silhouette, turning you into a mysterious, unidentifiable blob. Your webcam tries to adjust for the bright background, leaving your face underexposed.
Use Natural Light When Possible
Natural daylight is often the best light source. Position yourself facing a window during the day. Just be mindful of direct sunlight, which can be too harsh and create strong shadows; diffused natural light is perfect.
Invest in Good Lighting (Ring Lights, Softboxes)
If natural light isn’t consistent or available, consider investing in artificial lighting.
- Ring Lights: These are popular for a reason. They provide soft, even illumination that wraps around your face, often eliminating shadows. They come in various sizes and can usually be adjusted for brightness and color temperature.
- Softboxes or LED Panels: These professional-grade lights offer powerful, diffused light. They’re great for more dedicated setups and can make a huge difference in your overall webcam video quality.
- Desk Lamps: Even a simple desk lamp with a diffused light bulb (or a piece of parchment paper taped over it to soften the light) placed behind your monitor and pointing at you can significantly improve your image.
Declutter Your Background
A messy background is distracting and unprofessional. Take a moment to tidy up the area behind you. Remove anything that doesn’t add to your professional or personal brand.
Choose a Simple, Appealing Background
A plain wall, a bookshelf, or a well-arranged corner of your room works best. Aim for something that adds a touch of personality without drawing attention away from you. Think about colors that complement your skin tone and clothing. Virtual backgrounds can be an option, but they often have artifacts and require good lighting to work properly.
Step 2: Adjust Your Webcam Settings

Visual guide about How to Improve Webcam Video Quality
Image source: danmall.com
Many webcams, especially external ones, come with software that allows you to fine-tune various settings. Even built-in cameras often have basic adjustments available through your operating system or video conferencing apps.
Accessing Webcam Settings
- Dedicated Webcam Software: If you have an external webcam, install its proprietary software. This usually offers the most comprehensive control.
- Operating System Settings:
- Windows: Go to “Settings” > “Bluetooth & devices” > “Cameras” or search for “Camera settings.”
- macOS: Access settings within the application using the camera (e.g., FaceTime, Photo Booth, QuickTime Player, or third-party apps like OBS Studio or ManyCam).
- Video Conferencing Apps: Most apps like Zoom, Microsoft Teams, Google Meet, and Skype have their own video settings where you can select your camera and often adjust basic parameters like brightness and contrast.
Resolution and Frame Rate
Always aim for the highest resolution your webcam and internet connection can handle, typically 1080p (Full HD) at 30 frames per second (fps). While 4K webcams exist, 1080p is usually more than sufficient for excellent webcam video quality for most purposes, and less demanding on your bandwidth. Higher frame rates (like 60fps) result in smoother motion, but also require more processing power and bandwidth.
White Balance
White balance ensures that colors appear accurate, not too blue (cool) or too orange (warm). Most webcams have an automatic white balance, but if your video looks off-color, try adjusting it manually. Look for settings like “Auto,” “Daylight,” “Fluorescent,” or a Kelvin temperature slider.
Exposure and Brightness
Exposure controls how much light your webcam captures. If your video is too dark or too bright, adjust the exposure. Increasing brightness often helps in dimly lit rooms, but be careful not to overexpose (wash out) your image.
Focus
Some webcams have autofocus, while others might have manual focus. If your video looks blurry, check the focus. For manual focus, ensure you are sharply in focus. For autofocus, sometimes moving slightly back and forth can help the camera recalibrate.
Contrast and Saturation
- Contrast: This defines the difference between the lightest and darkest parts of your image. Too little contrast makes the image look flat; too much makes it look harsh.
- Saturation: Controls the intensity of colors. Too little makes colors appear muted or desaturated; too much makes them look unnatural and cartoonish.
Adjust these subtly to make your image pop without looking artificial.
Low Light Compensation
Some webcams have a “low light compensation” or “gain” setting. While it can brighten a dark image, it often introduces more digital noise or “graininess,” which can degrade your webcam video quality. It’s almost always better to add more physical light than to rely heavily on this setting.
Step 3: Hardware Upgrades and Considerations
Visual guide about How to Improve Webcam Video Quality
Image source: s3.amazonaws.com
Sometimes, even with the best lighting and settings, your webcam simply can’t deliver the quality you need. This is when hardware upgrades come into play.
Upgrade Your Webcam
If you’re still using a basic built-in webcam from an older laptop, a dedicated external webcam is often the most significant upgrade you can make to improve webcam video quality. Modern external webcams offer:
- Better Sensors: Larger sensors capture more light, leading to clearer images, especially in less-than-perfect lighting.
- Superior Lenses: Higher-quality glass lenses produce sharper, less distorted images.
- Advanced Features: Many come with better autofocus, wider fields of view, privacy shutters, and enhanced microphones.
Popular choices include models from Logitech (C920 series, StreamCam, Brio), Razer, and Elgato.
Use a Tripod or Mount
A shaky webcam is distracting. Use a small tripod or a monitor mount to keep your webcam stable. Many external webcams come with versatile clips, but a dedicated mount provides more flexibility for positioning and stability.
Ensure a Stable USB Connection
Connect your webcam directly to a high-speed USB port (USB 3.0 or higher) on your computer. Avoid using unpowered USB hubs or long extension cables, as these can sometimes degrade the signal and affect performance or even connectivity.
Check Your Internet Speed (for streaming/calls)
While not directly a webcam hardware issue, a slow or unstable internet connection can make even the best webcam video quality appear choppy, pixelated, or laggy to others. Perform a speed test (search “internet speed test”) and aim for at least 10 Mbps upload speed for reliable HD video calls. If your connection is poor, consider connecting via an Ethernet cable instead of Wi-Fi.
Step 4: Software Solutions and Post-Processing (Real-time)

Visual guide about How to Improve Webcam Video Quality
Image source: guidespot.com
Beyond your webcam’s internal settings, several software options can further enhance your video.
Update Webcam Drivers
Always keep your webcam drivers up to date. Manufacturers regularly release updates that improve performance, stability, and even video quality.
- Windows: Go to Device Manager, find your webcam under “Cameras,” right-click, and select “Update driver.”
- macOS: Drivers are typically managed through system updates. For external webcams, check the manufacturer’s website.
Use Webcam Software Enhancements
Some webcams come with advanced software that offers features like:
- Digital Zoom/Pan: Crop into your shot or pan without physically moving the camera.
- Color Correction Presets: Quickly apply different looks or fix color casts.
- Background Replacement: While we recommend a physical background, some software does a better job than built-in app features.
Programs like OBS Studio or ManyCam act as virtual cameras, allowing you to layer effects, combine multiple video sources, and apply advanced corrections before sending the video to your conferencing app.
Virtual Backgrounds (Use Sparingly)
Most video conferencing apps offer virtual backgrounds. While fun, they can often look unprofessional if not done well. If you must use one:
- Ensure you have excellent, even lighting.
- Wear clothes that contrast with the background color to avoid “clipping.”
- Consider using a physical green screen for the best results.
Video Conferencing App Settings
Many apps have specific settings that can affect your video quality:
- HD Video Option: Ensure “Enable HD Video” or similar is checked in Zoom, Teams, etc.
- Adjust for Low Light: Some apps have this feature, but as mentioned, it often adds noise. Test it to see if it improves or degrades your specific image.
- Bandwidth Usage: If your internet is struggling, some apps allow you to reduce video quality to prioritize stability. Only use this if absolutely necessary.
Step 5: Positioning and Framing
Even with perfect lighting and a top-tier webcam, poor positioning can ruin your shot.
Eye-Level Camera Placement
This is crucial for a natural and engaging look. Your webcam should be at eye level or slightly above.
- If it’s too low, it creates an unflattering “up-the-nose” angle.
- If it’s too high, you might appear to be looking down or away.
Use books, a monitor stand, or a tripod to adjust the height of your laptop or external webcam.
Maintain a Comfortable Distance
Sit a comfortable distance from your webcam. You want to be close enough that your face and upper body are clearly visible, but not so close that you fill the entire frame. A good rule of thumb is to have some headroom above your head and a bit of space on either side, showing your shoulders and chest. This allows for natural hand gestures.
Apply the Rule of Thirds
Imagine your screen divided into a 3×3 grid. Placing yourself slightly off-center, along one of the vertical lines, can create a more dynamic and visually appealing composition than being dead-center. Your eyes should ideally fall along the upper horizontal line.
Troubleshooting Common Issues
Even with all these tips, you might encounter some common webcam problems. Here’s how to tackle them.
Blurry Image
- Check Focus: If manual, adjust it. If autofocus, ensure enough light or move slightly to trigger it.
- Clean Lens: Gently wipe your webcam lens with a microfiber cloth.
- Resolution Setting: Make sure you’re set to 1080p or higher, not a lower resolution.
Grainy Video in Low Light
- Add More Light: This is almost always the solution. Frontal, soft light is key.
- Disable Low Light Compensation: If your webcam or app has this, try turning it off as it can introduce noise.
- Upgrade Webcam: Better sensors handle low light more gracefully.
Choppy Video/Lag
- Internet Connection: Test your upload speed. Use Ethernet if Wi-Fi is unstable.
- Close Background Apps: Other programs might be hogging your CPU or bandwidth.
- USB Port: Ensure a direct, high-speed connection.
- Update Drivers: Outdated drivers can cause performance issues.
Color Problems (Too Blue, Too Orange, Washed Out)
- Adjust White Balance: Manually set it or cycle through presets until colors look natural.
- Check Light Source: Mixed lighting (e.g., warm desk lamp and cool window light) can confuse auto white balance. Try to use one dominant light source.
- Contrast/Saturation: Fine-tune these settings in your webcam software.
Conclusion
Improving your webcam video quality doesn’t have to be complicated or expensive. By focusing on a few key areas – primarily lighting, environmental setup, and adjusting your webcam’s settings – you can make a monumental difference. Remember, a clear, well-presented video enhances your communication, professionalism, and overall online presence. Take these steps, experiment with different adjustments, and confidently present your best self in every video call, stream, or recording. You’re now equipped to look fantastic every time you turn on your webcam!



