


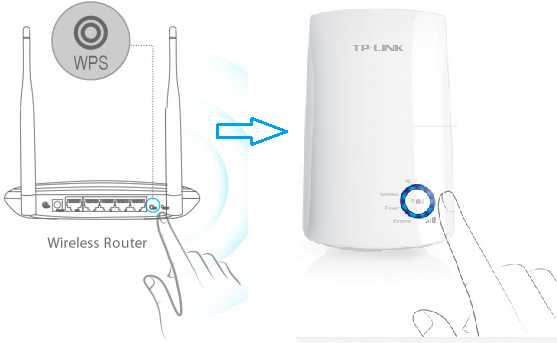
To link your WiFi extender to your main router, simply connect the extender to your network using either WPS or manual setup via your web browser. Ensure both devices are within range, then follow the quick pairing steps to extend your WiFi coverage seamlessly.
Connecting a WiFi extender to your main router is a straightforward process that can significantly improve your internet coverage. Whether you prefer the quick WPS method or a more detailed manual setup, getting your extender properly linked ensures every corner of your home stays connected. In this guide, we’ll walk you through the essential steps to set up your extender efficiently, troubleshoot common issues, and optimize your WiFi signal. No technical expertise needed—just a few simple steps and your internet will be reaching every room with ease. Let’s make your WiFi stronger and more reliable today!

How to link wifi extenders to your main router
Connecting a wifi extender to your main router helps improve your internet coverage and reduces dead spots in your home or office. Proper setup ensures that your devices stay connected smoothly and enjoy faster speeds. This guide will walk you through the steps needed to link your wifi extender securely and effectively.
Understanding the basics of wifi extenders
Wifi extenders, also known as repeaters or boosters, amplify your existing wifi signal. They receive the signal from your router and rebroadcast it to cover larger areas. Knowing how they work is essential for a successful connection and optimal performance.
Extenders can operate in different modes, including:
- Repeater Mode: Extends the existing wifi signal wirelessly.
- Access Point Mode: Connects to the router via Ethernet cable and creates a new wifi access point.
Choosing the right mode depends on your setup and coverage needs. Most home users prefer the repeater mode for simplicity.
Preparing your equipment for setup
Before linking your wifi extender to your main router, gather all necessary equipment. Ensure your extender has fresh batteries if it operates on batteries, or is plugged into a power source. Keep your existing router nearby, with its admin credentials ready.
Additionally, verify that your router’s firmware is up to date. This helps prevent compatibility issues and improves performance during the setup process.
Positioning your wifi extender correctly
Placing your extender in the right spot is crucial for effective coverage. Position it roughly halfway between your main router and the area with poor signal. Avoid obstructions like thick walls, metal objects, or electronic devices that can interfere with signals.
Use your device to test signal strength as you move the extender around until you find an optimal location. Many extenders have indicator lights to assist with placement, signaling if the connection is strong or weak.
Connecting your wifi extender to the main router
Method 1: Using WPS (Wi-Fi Protected Setup)
Many wifi extenders support WPS, making setup quick and simple. Start by pressing the WPS button on your router. Within two minutes, press the WPS button on your extender.
The devices will communicate and establish a secure connection automatically. The extender’s indicator lights will confirm a successful connection.
Method 2: Manual setup via web interface
If WPS is unavailable or you prefer manual setup, connect your device to the extender’s default network. Open a browser and enter the extender’s IP address or URL, often printed on the device or manual.
Follow the setup wizard, select your main wifi network, and enter your Wi-Fi password when prompted. This process links the extender to your main router securely.
Configuring your wifi extender settings
Post-connection, access the extender’s admin panel for further configuration. Use the default IP address or URL to log in through your browser. Typical default credentials are admin/admin or admin/password.
Within the settings, you can change the network name (SSID) to match your main network or create a new one. Setting a different SSID helps distinguish the extender’s network from your primary wifi.
Adjusting channels and security settings is also advised. Use WPA3 or WPA2 encryption for security. Always update your password regularly for protection.
Testing the connection and coverage
After setup, test your internet connection in different parts of your home. Use speed test apps or websites to measure performance. Confirm the signal strength on devices near the extender and in distant rooms.
If signals are weak, consider repositioning the extender or adjusting its settings. Regular testing helps ensure your wifi network remains reliable and fast.
Troubleshooting common issues
Extender not connecting to the router
Ensure the extender is within range of the main router. Double-check the password and network name during setup. Reset the device if necessary by pressing the reset button for ten seconds.
Slow internet speeds after linking
This could be caused by interference, wrong placement, or outdated firmware. Move the extender to a better location and update its firmware. Also, check if your internet plan supports the speeds you expect.
Frequent disconnects
Interference from other devices or overcrowded wifi channels can cause disconnects. Change the channel in the extender’s settings to a less congested one. Reboot the extender periodically to refresh the connection.
Additional tips for effective wifi extension
- Use dual-band extenders: These support both 2.4 GHz and 5 GHz, providing better speed options.
- Keep firmware updated: Regular updates fix bugs and improve performance.
- Secure your network: Change default passwords and use strong encryption to prevent unauthorized access.
- Limit connected devices: Too many devices can slow down your network. Manage connections accordingly.
Related topics you might find helpful
- Choosing the best wifi extender for your home
- Difference between wifi extenders and mesh networks
- Enhancing wifi signal with routing and placement tips
- How to update router and extender firmware
Linking your wifi extender to your main router enhances your internet experience by providing wider coverage and more reliable connections. Following each step carefully ensures smooth setup and ongoing performance. Regular adjustments and maintenance keep your network running efficiently for everyone in your home or office.
NETGEAR WiFi Extender Setup: How To
Frequently Asked Questions
What steps should I follow to connect my Wi-Fi extender to the main router during setup?
Begin by plugging the Wi-Fi extender into a power outlet near your main router. Use a device such as a smartphone or computer to access the extender’s setup interface through its default network or dedicated app. Follow the on-screen instructions to connect the extender to your existing Wi-Fi network, which usually involves selecting your main Wi-Fi network and entering its password. Once connected, move the extender to a location where it can effectively extend your network coverage.
How can I verify that my Wi-Fi extender is properly linked to my main router?
After setup, check the indicator lights on the extender. Most devices have LED indicators that display connection status—green or solid lights typically mean a successful link. You can also test the connection by connecting a device to the extender’s network and browsing the internet. Additionally, accessing the extender’s management interface allows you to see connected devices and network status, confirming a proper connection to your main router.
Are there specific settings I should configure on my main router to improve the linking process with the extender?
Yes, ensure that your main router has DHCP enabled to assign IP addresses automatically. It’s helpful to use a consistent Wi-Fi password and security protocol across both your main router and extender. Additionally, if your router supports features like WPS (Wi-Fi Protected Setup), enabling or using WPS during setup can simplify linking the devices. Keeping your router firmware updated also ensures compatibility and better performance during the extension process.
How should I position my Wi-Fi extender for optimal connection to the main router?
Place the extender midway between your main router and the area with weak Wi-Fi signals. Avoid physical obstructions like thick walls, metal objects, and appliances that can interfere with the signal. A higher position, such as on a shelf or mounted on a wall, often improves coverage. Use signal strength indicators on the extender or a Wi-Fi analyzer app to find the best location for a strong and reliable connection.
Can I connect multiple Wi-Fi extenders to a single main router effectively?
Yes, you can connect multiple extenders to enhance coverage as needed. When doing so, place each extender strategically to ensure seamless coverage without overlaps or gaps. Configure each extender with a unique network name or keep the same SSID for a unified network experience, depending on your preference. Avoid placing extenders too close to each other to prevent signal interference, and verify that your main router can handle multiple devices efficiently.
Final Thoughts
To link wifi extenders to your main router, start by placing the extender near your router. Connect to the extender’s setup network and access its configuration page via a browser. Follow the on-screen instructions to connect the extender to your Wi-Fi network. Once set up, move the extender to its optimal location for better coverage. Remember, understanding how to link wifi extenders to your main router ensures a seamless and reliable internet experience throughout your space.



