To set up a router parental schedule quickly, access your router’s settings through its web interface, locate the parental controls or access restrictions section, and define specific times when internet access is allowed or blocked for individual devices. Save your settings, and you’re all set! This simple process helps you manage your kids’ screen time effectively.
Setting up a parental schedule on your router might seem tricky at first, but it’s quite straightforward once you understand the steps. This feature allows you to control when devices can connect to the internet, giving you peace of mind and helping your children develop healthier online habits. Whether you’re trying to limit late-night browsing or restrict internet access during homework hours, configuring your router’s parental controls is an efficient way to manage your household’s digital environment. Keep reading to learn how to quickly and easily set up this essential feature and keep your little ones safe online.
How to Setup Router Parental Schedule: A Step-by-Step Guide
Setting up a parental schedule on your router is a great way to manage your children’s internet access. It helps you control when they can go online and for how long, making sure they stay safe and focused. This guide will walk you through each step with clear instructions and helpful tips.
Understanding Parental Scheduling on Routers
Parental scheduling allows you to specify times when the internet is available or blocked for specific devices connected to your network. It gives you control without needing to monitor every device manually. Modern routers often include this feature, making it easier to supervise your children’s online time.
Before starting, make sure your router supports parental scheduling. Check the user manual or manufacturer’s website for details. Some routers may have limited features, so it’s good to verify compatibility.
Accessing Your Router’s Admin Panel
The first step is to log into your router’s admin dashboard. Usually, this is done through a web browser using the router’s IP address. Common addresses include 192.168.1.1 or 192.168.0.1.
- Open a web browser on your computer or smartphone connected to your Wi-Fi.
- Type the router’s IP address into the address bar.
- Enter your username and password when prompted. The default credentials are often “admin” for both, but you should change these for security.
If you cannot find your login details, check the router’s manual or look for a sticker on the device. For advanced users, some routers support login via mobile apps, which can be more straightforward.
Locating Parental Control Settings
Once logged in, browse the dashboard to find the parental control section. This may be labeled as “Parental Controls,” “Access Restrictions,” or “Family Settings,” depending on your router model.
Some routers have dedicated tabs or menus, while others might hide these features under advanced settings. If needed, consult the user manual or online support resources for your specific router.
Creating a Parental Schedule
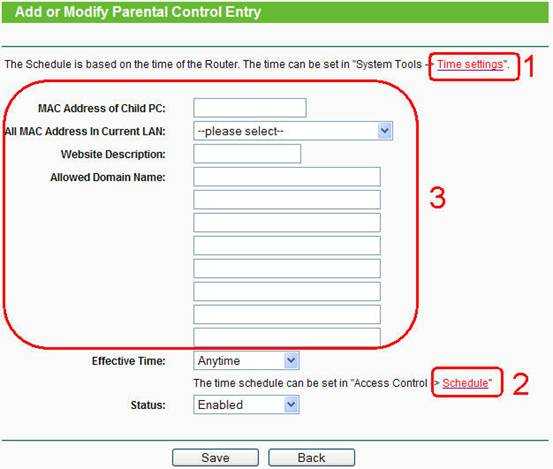
After accessing parental controls, you will typically see options to add rules or set schedules. Here’s a general process:
- Select the device(s) you want to manage. This could be by device name, MAC address, or IP address.
- Choose the schedule or time restrictions. You may see options like “Block Internet” or “Allow Internet” during certain hours.
- Define the days and times the rules should apply. Use a weekly calendar or daily time slots.
Some routers allow multiple schedules, so you can create different restrictions for weekday and weekend days.
Assigning Devices to Schedules
Devices connected to your network can be identified in the router’s device list. This might include smartphones, tablets, computers, or gaming consoles.
Select the device you want to control, then assign it to the schedule you created. If your router supports device grouping or profiles, use these features for easier management.
Testing and Adjusting the Parental Schedule
Once your schedule is set, test it to ensure it works correctly. Disconnect and reconnect the device to see if the internet access follows the rules you established.
If the schedule isn’t functioning properly, double-check the times, days, and device assignments. Make sure the rules are enabled and saved in the router’s settings.
Tips for Effective Parental Scheduling
- Start with simple schedules. Gradually increase restrictions as needed.
- Communicate with your children. Explain the reason for these restrictions to avoid misunderstandings.
- Update schedules regularly. Adjust times for homework, chores, or special occasions.
- Combine with other parental controls. Use content filters, screen time limits, and monitoring tools for comprehensive management.
Advanced Features and Customization
Using Multiple Schedules
If your router supports multiple schedules, create different ones for weekdays and weekends. This allows more flexibility in managing internet access based on daily routines.
Setting Up Content Filtering Alongside Schedules
Many routers offer content filtering options to block inappropriate websites or keywords. Combining these with schedules enhances your control over your child’s online environment.
Enabling Notifications and Alerts
Some routers can send notifications when restrictions are applied or devices try to access the internet outside scheduled times. Enable these alerts to stay informed.
Common Troubleshooting Tips
- If restrictions don’t work, verify that the correct device is targeted.
- Ensure that you saved and applied all changes before exiting.
- Restart your router if new settings seem ineffective.
- Update your router’s firmware to access the latest features and fix bugs.
Alternative Methods if Your Router Lacks Parental Scheduling
If your router doesn’t support parental schedules, consider alternative options like:
- Using built-in parental controls in your operating system or device settings.
- Installing third-party parental control apps or software.
- Utilizing a separate Wi-Fi access point or mesh network with advanced parental features.
Setting up a parental schedule on your router is an effective way to manage internet access for your family. By following these steps, you can ensure your children are online during appropriate times and stay protected from unsuitable content. Regularly review and adjust the schedules to fit your changing needs, creating a safer and more balanced online environment for everyone.
How To Set a Time Schedule on Your Wireless Router Access| Parental Control|
Frequently Asked Questions
How can I establish a parental control schedule on my router for different devices?
To set up a parental control schedule, log into your router’s admin interface and navigate to the parental control section. Select the devices you want to manage and specify the days and times they can access the internet. Save your settings, and the router will enforce these schedules, limiting internet access according to your preferences.
What steps should I follow to set time limits for internet access on a specific device?
Access your router’s settings and go to the parental or access control options. Identify the device or its MAC address, then set daily or weekly time restrictions. Define the allowed hours for internet access, save the configuration, and the router will automatically disable internet for the device outside the designated times.
Is it possible to create different internet access schedules for multiple family members?
Yes, most routers allow you to assign different schedules based on device or user. Create a profile for each user or device in the parental control section, and set specific timeframes for access. This way, family members can have independent schedules tailored to their routines.
How do I modify or update the parental schedule once I have set it up?
Log into your router’s admin panel, locate the existing parental control or schedule settings, and select the profile or device you wish to modify. Adjust the days and times as needed, save your changes, and the new schedule will take effect immediately. Be sure to confirm your modifications before exiting.
Can I temporarily disable the parental schedule without removing the settings?
Many routers offer a toggle or enable/disable option for parental controls. Simply access the parental control section, locate the schedule you wish to suspend, and deactivate it temporarily. Reactivate it whenever you want to enforce the schedule again, without losing your configuration.
Final Thoughts
To set up a router parental schedule, start by logging into your router’s admin panel. Locate the parental controls or access restrictions section. Follow the prompts to specify time limits and device restrictions for your children.
Ensure you save your settings before exiting. Remember, knowing how to setup router parental schedule helps you manage your family’s internet use effectively and securely.

I specialize in process engineering and system optimization. I enjoy writing guides that simplify troubleshooting and help improve efficiency in everyday tech use.


